Saturday, 1 June 2019

Stoneleigh Kit Car Show - 2019

My son and I  took a quick trip up to Stoneleigh for the National Kit Car Show over the first May bank holiday weekend.

The last year seems to have zipped by; at last year's show we were still doing research before buying our cobra kit and now we are on the early stages of the build.

The show was much busier than last year and it was good to see the AK stand getting lots of visitors!

The main purpose of the visit was to get some thoughts and ideas around future details of the build; colours, dashboard layouts, lights, wheels etc etc.

Unfortunately the visit opened up some very clear differences between my son and I!  I am tending towards quick-lift jacks rather than over-riders, he is thinking full bumpers and over-riders.  I wanted a classic wooden steering wheel, he wants a modern black wheel.  I was thinking classic gauges in the cockpit, he found some horrible digital colour changing gauges (no way!).

It's a good job we have plenty of time before having to make some of these choices!!!!


Lights....modern?...

...or classic P700 style...?


Classic oxblood cockpit...

Nice grey leather cockpit...

Or black...?  (No wooden steering wheels in sight!!)

We also had a good wander through the trade stands and picked up some essentials including some abrasive disks, a new set of automatic wire-strippers, a new sign for the garage, some more powder-coating powder and a TIG welder.  OK the TIG welder wasn't an essential but I am a sucker for a bargain and it was a show special, half price at £100!


Retail therapy....

Of course the welder turned out to maybe not such a bargain after all and when I got it home and opened it up it has a strange blue plug on the end of the power lead.  Apparently they don't fit a standard 13A socket......and it requires a 32A supply.....and my garage only has a 16A supply.......

Oh well - time to call the electrician!!

Can't get that into a normal socket!!!


Monday, 13 May 2019

Front Axle Part 5 - Front Hub Refurb

In between the fun and games of assembling the front suspension, I have been pressing on with cleaning up the front hubs ready for reassembly.

First step was a good clean-up with a nylon brush and a bucket of Gunk degreaser to remove all the loose crud and old grease from inside the hubs.


Step 1 - Degreasing

This was given a rinse off with water, dried off with a towel and then to prevent any (further) flash rusting of the machined surfaces, I put the hubs in the oven for 30mins to dry off any last traces of water.


Dinner doesn't look very appetising....

I then set to work with a variety of steel wire brushes in a rotary drill.  I bought a couple of twist knotted steel wire brushes from Screwfix which were very effective at removing a lot of the surface rust.

HEALTH AND SAFETY TIP 1 - again an obvious one, but when using wire brushes in power tools, always ensure the work piece is secured in a vice or work bench and keep two hands on the power tool (especially if the trigger lock is on).  If you hold the work piece with one hand, there is a danger that the brush can snag on part of the work piece and kick back onto the hand holding the piece.  I was wearing gloves but the twisted knot brush still managed to give the end of my thumb a good stinging!


Steel Brush 1 - Glove 0

After a good session with the wire brushes, the hubs had cleaned up quite nicely.


After wire brushing

There was still quite a lot of rust engrained in the cast surface, especially on the back face of the hub, so I broke out the Budget Blaster and spent a couple more hours cleaning up the hubs.  Have to say I was very happy with the results.


Blasted vs Brushed

Unfortunately I left the hubs for a couple of weeks between sand blasting and coating and when I went back to them a fair amount of surface rust had reappeared.  I assume there must be some salt residue in the sand I used for the cleaning process that reacted with the freshly cleaned metal surface which caused this (I have other parts that have been cleaned up / polished with wire brush and flap wheels alone that have not shown any further signs of rusting over the same period).  Still another going over with the wire brush and another couple of hours on the sand blaster got them back to their prior glory!

HEALTH AND SAFETY TIP 2 - never ignore your previous health and safety advice.  Rather stupidly I did the same thing again but this time was not so lucky with the wire brush catching on my glove and running up my arm until it found some bare skin to abrade....


Come back - its only a flesh wound..!!

Having re-cleaned both the hubs it was time to have a go at powder coating them!

For cast parts, particularly cast iron and aluminium parts, it is recommended to preheat the parts prior to coating to "outgas" or "degas" them.  The cast surface  can trap contaminants which, when heated, "outgas" and can cause porosity problems or lack of adhesion to coatings.

Firstly I masked off all the bits of the hub that I did not want to coat using high temperature masking tape.  The hub was then suspended from the oven shelf from my "specialist powder coating oven" using stainless steel wire wrapped around a couple of the wheel studs and secured with a couple of old nuts.

Masking Tape Applied...
Suspended from oven shelf (Note Project Powdercoating Stand in use)

The hubs were then put in the oven at around 230 degrees C for 30-40 mins before being removed and allowed to cool.  I then gave the hubs a good clean with Eastwood PrePrep to remove any last traces of grease and contaminants, gave them a final wipeover with a tack-rag and let them dry for few minutes.

Then it was time to powder coat!

The oven was preheated to 230 degrees C.  I hooked the powder coating gun up to my compressor, with the regulator set to around 6-7psi at free flow.  The ground clip from the powder coating gun was clipped to the hub and I attached a pot of gloss black powder to the gun.

As it was quite a still day, I risked attempting to coat the hubs outside.  Generally this worked OK, although the powder is very fine and even the slightest breeze would make coating very difficult.  The theory is that the powder coating gun kit provides a static charge to the powder within the gun with the effect that the charged powder is attracted to the grounded part that you are coating.

Theory seemed to be correct and I managed to coat most of hub quite quickly with a good covering of powder.  It can be difficult to get powder into intricate shapes and recesses due to something called the Faraday Cage effect (one for the electro physicists reading....) which causes some issues with the charged powder getting into these areas.  I had a couple of issues particularly with the ABS ring on the rear of the hub and some of the areas on the rear of the wheel studs.  I managed to get powder onto these by removing the deflector from the end of the gun and "misting" the area at a slightly lower air pressure.

Powder coated and ready for curing..

With the hub coated it was time to gently place it into the oven (without knocking any of the powder off) to be cured.  Once hub was in oven the temperature was turned down to 200 degrees C (which is the curing temperature for the gloss black I was using - different powders have different curing temperatures and times).

As the part starts to heat up, the powder starts to flow out - that is you can start to see it changing from the matt powder to a glossy finish.  After the powder has flowed out across the whole part, that is the point at which the curing time is started.

The hubs being quite a large and heavy part took quite some time to heat up to the point where the powder had glossed over everywhere - around 30 minutes.  This was not helped by the oven that I have bought only having the option to use the top heating element or the bottom element individually and not both at the same time - hence when using the top element (as I was), the top surface of the hub had started to flow out, well before the bottom surface had.


Top of hub has started to flow out (glossy) while bottom is still slightly matt

When the powder had flowed out across the whole hub, the timer was set for 20 minutes after which it was removed from the oven and left to cool


Freshly cooked hub....

Once the hub had fully cooled, I unhooked it from the oven shelf and removed all traces of the masking tape.  To prevent any further rusting before fitting the hubs to the stub axles, I gave all the exposed metal surfaces a wipe with some WD40 which will hopefully protect them.

Have to say I am actually pretty pleased with the results.  


Back face of powder coated hub....

....and the front face


Saturday, 20 April 2019

Christmas Holiday Projects - Powder Coating Stand


I have decided to try DIY powder coating the various donor parts that I will be re-using.  My plan is to buy the Eastwood Hotcoat Dual Voltage powder coat gun from Frost Restorations (although at time of writing it is still out of stock).

When watching the Eastwood powder coating guide on YouTube they used a cunning stand to clamp an oven shelf (with parts to be coated hung from the shelf) allowing easy transfer into the curing oven.


Powder Coating Stand - photo courtesy of Eastwood.com

Allows transfer of oven shelf and parts directly into
oven for curing - photo courtesy of Eastwood.com

I thought it was be a good project to try and make my own stand as it would allow me to brush up (learn!) on some of my metal working skills prior to using them in anger on the Cobra build.

I bought the main metal sections, 3 No 1m lengths of 25mm box section, a 1m length of 50mm by 3mm angle section and a 1m length of 25mm by 3mm plate from Ebay, some M8 roofing bolts from Toolstation and some M8 Thumbwheels and 25mm square inserts from Ross Castors.


Selection of steel sections

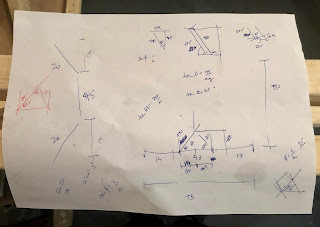
I used the proverbial back of a fag-packet to work out dimensions, angles and hole positions, testing my memory of trigonometry to the full!


Detailed Engineering Fabrication Drawing....

I cut the steel sections to the required lengths / angles using a Rage Evolution Mitre Saw.  I have used the saw many times previously for timber but this was the first time I had tested it out on metal.  Have to say it cut through the various steel sections very easily and with nice clean cuts.  Usual H&S rules apply - cutting metal does result in lots of tiny shards of metal being flung everywhere - wear eye protection and gloves (and I spent the next week picking small bits of metal out of my coat and jeans!!!).


Sections cut to length - starting to take shape!

One of the main reasons I decided to have a go at this project was so that I could have a go at MIG welding.  I bought a MIG welder years ago when I was thinking of attempting some body repairs on my Trans Am but never actually got round to using it!

I have a Siegen Mini-Mig 130 (which is a cheap Sealey brand).  Its quite a small output welder and does not have a fully adjustable power level (2 switches giving four power levels (Min I / Min II / Max I / Max II)).  As I bought it with the intention of only welding thin body panels I wasn't that bothered about a higher power machine at the time.


It was a bargain 10 years ago....

I did the obligatory self-learning MIG welding course by watching a number of videos on YouTube and feeling confident headed to the garage to set up the welder and hope, that after 10 years of gathering dust in my garage, it actually worked!

I had some old lengths of 5mm steel plate lurking in my garage and used a couple of these to practice laying down a decent weld bead.  Well the good news was that the welder worked.  The bad news is that welding is not as easy as it looks!  Lots of sparks and spatter but not a lot of weld!  Eventually I concluded that the lower power settings were a waste of time, and after a bit of twiddling with the wire speed control knob and experimenting with the angle of the welding torch I finally managed to produce something that looked like a reasonable bead of weld.  Time to start welding up my project!

I started by trying to weld an end cap on the bottom of one of the box sections. I cut a square section of plate and tack welded it in place.  So far so good.  However the first attempts to weld along the joins were disastrous.  The results were back to being blobby and splattery even though I had not changed the settings on the welder.


End cap tack welded in place

I thought I had solved the issue when I realised that I had run out of gas!  I was only using a small disposable Argon / CO2 gas cylinder and clearly my extensive test welding had exhausted the supply.  However even after buying a couple of new cylinders, I still could not get a decent weld; still blobby and grinding down the weld revealed holes and poor penetration.  


Not the best advert for welding...

I pressed on, welding and grinding and rewelding and regrinding until I was happy enough with the end result (which used another whole bottle of gas to weld on two end caps!!!!)


After extensive welding and grinding....

It was then that I realised that I had got a slight twist in the cable leading to the welding torch which was enough to cause the wire feed to be a bit erratic.  Once I untwisted the torch, weld quality suddenly improved - this is a relative statement, the results were far from what I would call good, but a definite improvement!  A lesson learned - keep the cable from the welder to the torch as straight as possible!

Next step was to drill the holes in the bottom of the main section, the bottom brace and the bottom legs so that I could get the position of the plates either side of the bottom brace in the correct place.  Using my precise engineering drawing (?!) I marked the hole locations with a metal scribe and centre punch.  I drilled 4mm pilot holes and then opened out to 6mm and then to 8mm.


Drilling....

Drilled....

Final steps were to weld two sections either side of the bottom brace, to weld up both of the bottom legs and the weld the angle section onto the top of the main leg.  Although my welding was still a little untidy, once ground down the joints all looked pretty solid.


Plates welded either side of bottom brace
Bottom Legs welded together

Almost looks like a stand!

I tack welded a couple of nuts onto the bottom brace and onto the top shelf bracket then gave everything a wipe down with white spirit and sprayed it all with 3 coats of Hammerite Smooth.

I am actually pretty chuffed with the result - looks just like it was supposed to (which is always a bonus!!) and the thumbwheels and end caps add a nice professional looking touch (just don't look too closely at the welding).


Paint or Powdercoat?

Since I bought the donor axles for this project I have been mulling over whether to just paint the refurbished parts or whether to get them powder coated for a more durable finish.

To me this project is about doing as much as I can myself during the build process, learning as much about how to do it all, and being able to say at the end "I did all that!".  

So in that regard painting seemed the obvious choice.  Powder coating requires specialist equipment and large curing ovens; well beyond the scope of the average DIY car builder.

Well maybe not......

Over the many years that I have been attending car shows, I've often walked past a small stand promoting a home powder coating system.  I've stood and watched the demonstrations as the guys on the stand powder coat small squares of metal and then cure them using a hot air gun or an Infra Red heat lamp.  And I've always walked away thinking "what a load of...."

These stands were run by a company called electrostaticMAGIC (which is quite ironic as the company that AK use to powder coat their chassis and parts is called Electrostatic Magic Ltd......) and I actually need to offer these guys a huge apology.

In this internet powered age, I managed to find several very positive reviews of their product.  They have a blog on their website and on that, one of their customers had built their own curing oven using an Ikea filing cabinet and two Lidl hot air guns!

While scanning YouTube looking for reviews of the electrostaticMagic system I found a video by Eastwood covering their home powder coat system, which included a full demonstration of their dual voltage system.  This uses a lower voltage to charge the workpiece, together with a diffuser on the end of the gun, to provide better coverage and adhesion of the powder to intricate parts.  What was more interesting though was that they used a small table top oven to cure the parts which looked just like a normal small oven freely available on Amazon and eBay.

So maybe home powder coating could be a realistic option after all, at least for smaller parts.

It didn't take me long to decide to give powder coating a go! I decided to go with the Eastwood system over the electrostaticMAGIC version because of the dual voltage option. 

The Eastwood system is distributed in the UK by Frost Restoration, who sell all sorts of interesting tools, equipment and products for the auto restoration enthusiast.  Unfortunately having made the decision to go with the Eastwood option, Frost did not have any in stock and were not expecting any to be imported until early 2019!!  So I was just going to have to wait, which wasn't really a problem as, at that time, I was not ready to start painting / coating donor parts in any case.

Besides the wait gave me time to scour eBay, Gumtree and Marketplace for a suitable small oven.  This also took a fair amount of time to find one that was of the right size and at the right price, but eventually I picked up a 27 litre VonShef oven for the grand sum of £25!


Powder coating oven - I can also do my dinner in the garage now....

The guys at Frost Restoration had promised to give me a call as soon as they got the Eastwood system back in stock and, true to their word, I got a call from them towards the end of January and immediately ordered an Eastwood Hot Coat Dual-Voltage Powder Coating Gun Starter Kit.  The starter kit comes with 250g of gloss black powder, some high temperature masking tape (although I bought some extra rolls in various widths off Amazon), a variety of silicon plugs for masking holes / threads, some stainless steel hanging wire and some spare bottles for storing powder.  I also bought some Eastwood Pre-Prep (to remove grease prior to coating) from Frost and some tack-cloths from Amazon to ensure a nice clean surface prior to coating.


Ready to go powder coating!!

Unfortunately Frost don't sell the full range of Eastwood powders and only have a very limited range of basic colours.  However electrostaticMAGIC have a wide range of colours including metallic, candies, translucent and clear coats and even a chrome effect powder.  I will probably have a go with some of the metallic colours at some point in the future but for now just settled for 500g of Satin Black (to match my AK chassis).

So now I need to finish getting all the donor parts cleaned, stripped and prepped for coating.  Will let you know how it all goes!!

Steering Part 1 - Installing Steering Rack

The next task I tackled was the installation of the new AK power steering rack.

Again this should have been fairly straightforward - offer rack up to chassis, install nuts and bolts (M10 by 70 bolts, M10 washers and M10 Nylocs - not supplied by AK) and job done!?

AK make the point in the build manual to check that the pipes on the new rack do not foul on the chassis.  I was already aware from Richard's build progress that he had run into problems with this and I therefore was betting I would have the same issue.

True enough when I did the initial trial fit, one of the the two pipes on the rack was touching on the end of the off-side chassis rail.

Initial Trial Fit of Steering Rack....

....showed fouling of pipe on end of chassis rail

Another consultation with AK followed - Jon didn't see this to be an issue as the rack is solidly fixed to the chassis and can't move.  While this may be true I was still concerned that while the rack and chassis might not move relative to one another, vibrations transmitted through the chassis might still cause some slight rubbing of the pipe on the edge of the chassis rail which could eventually lead to failure of the pipe.  So I decided to try and get some suitable clearance between pipe and chassis.

I tried loosening the offending pipe to see if it could be moved slightly forward to provide some clearance - but that didn't work.  I also removed the pipe entirely to see if I could alter the bend slightly to provide clearance.  While this did look possible I was concerned that this might alter the length between the pipe unions and put some stress on the bends at each end.

In the end my fix was rather simple.  I wrapped a piece of spare 3mm steel strip in a towel to protect chassis and pipe, placed it on the end of the offending chassis rail, placed the rack into position and then fully tightened up the bolts.  The act of tightening the bolts, caused the steel spacer to push the pipe back out of way and provided a suitable amount of clearance.

Clearance granted!

I then did a final installation of the M10 securing bolts, with some thread lock on the nut end for good measure.

The ball joints are then screwed onto each end of the rack - the AK Build Manual recommends 14 full rotations of each ball joint as an initial setting.  You then need to measure between the centre of each of the ball joint studs and make adjustments as necessary (making sure to adjust both ball joints the same amount) to achieve a measurement of 47.5" between studs.

The ball joints are then secured to the uprights with M14 Nyloc Nuts (supplied) although I have not fully tightening these at present a) because I think I will add an M14 washer under the nut and b) I will leave final tightening until I have checked and set toe angles at some point in the future.

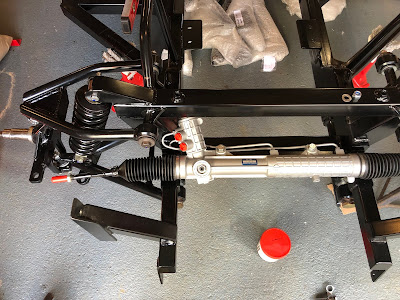
Steering Rack Installed

Front Axle Part 4 - It’s a Shocker

With the caster angles set, and new lower front wishbone shafts delivered, the next task was to carry out the final reassembly of the front suspension and install the front shock absorbers.

This was a simple matter of removing each of the wishbone shafts in turn, being very careful not to dislodge the wishbone and washers.  I then stuffed a goodly amount of copper grease into the front end of each wishbone and applied an equally liberal coating of copper grease to each of the wishbone shafts.  I then re-installed the shafts, which pushed the plug of copper grease through to the rear of each wishbone (hopefully aiding to ensure the full length of the wishbone and chassis tube is greased up).  The excess grease was removed with a wad of paper towel.

Copper Grease "Plug" at front of Wishbone
A generously lubricated shaft.....(minds out of the gutter please....)

For the lower wishbone shafts, I purchased some additional M22 washers from Westfield Fasteners to put under the bolt head to accommodate for the slight extra length of the shaft.  I also wasn't happy with the way the M14 castellated nut sat on the end of the inner sleeve of the lower wishbone bushing, so I also bought some extra M14 washers for the nut end of the shaft.

With all four shafts, greased, reinstalled and nuts tightened up hand tight, it was time to install the front shock absorbers.

As it seems to be with this Cobra building adventure, not all tasks are as simple as they should be.  I started by test fitting the 7/16" by 2.5" front shock bolts (supplied by AK) in each of the holes.  All were fine, except for the nearside lower shock mounting, which would not pass through the bushing which is pre-installed in the lower wishbone.  Closer inspection revealed that the inner sleeve of the bushing was slightly out of round at the front (the end was also a bit ragged which I was not altogether happy with either).

Slightly flattened lower shock mounting bushing

I decided to try and ream the inner bushing out with an 11mm drill bit, which appeared to be a great idea, until about the last mm of travel on the bit, which caught on the end of the inner sleeve and tore it out of the rubber completely!

B*gger......!

Unintentionally Disassembled Front Shock Bushing...

However this unintended action did reveal that the inner sleeve did not look in very good shape at all; not only was the front edge all ragged but it looked a bit distorted / crushed in the middle.  

A quick email to AK and Jon offered to press in a new bushing for me - this did mean that I had to remove my newly installed lower wishbone from the chassis, but that's why I hadn't fully tightened up any of the nuts yet wasn't it?

A quick trip up to AK, a cup of tea and a chat with Jon later, and I was returning home with a new bushing installed.

New (better looking) lower shock bushing courtesy of AK

Then it was a simple matter of applying copper grease liberally to the bushings and the shock mounting bolts and installing shocks on both sides.

Off-side front Shock installed

Final job was to tighten up all the bolts to the recommended torque settings (as per the Haynes Manual for the Jaguar XJ40).  For information, these are as follows:


I was unable to get a socket and my torque wrench onto the lower balljoint stud nuts, so I just tightened these as much as I could by hand using a spanner.  

Also with the lower wishbone pivot nuts, I ended up torquing these to around the correct value but then had to back them off slightly to be able to fit the split pin through the castellated nut and hole in the shaft.

Lower Front Wishbone Shaft - Retaining Pin inserted and secured

I also found when tightening the upper shock bolts that the bolt head was starting to cause the powerboat underneath it to crack slightly.  AK only provide a single washer per bolt (which I had put on the nut end) so I bought some additional 7/16" washers for the bolt ends and re-installed and re-torqued bolts to specification.

As each bolt is torqued down, I consider it good practice to mark it in some way.  I did this using a small blob of nail varnish on the bolt and nut.  I spent many happy hours in the local chemist perusing the shades before I settled on Danny Boy Blue.....


Other shades are available....


IMPORTANT NOTE

I have not been carrying out the assembly of the front suspension in exactly the same order as the AK build manual, mainly because I am not yet ready to install the front hubs and I have yet to refurbish my front brake callipers.

This does mean that I missed out a key stage prior to installing the shock absorbers which is to set the front camber angles (i.e the angle between the vertical axis and the steering axis when viewed from the front of the car).  The AK Gen III wishbone have elongated holes in the upper wishbone ball joint mounting for this adjustment.  However the camber is measured by checking the vertical angle of the brake disk with the wishbones set horizontally.

Now I had remembered that I needed to set the camber angle, hence I have not yet fully tightened the upper ball joint mounting bolts.  However, in order to get the wishbones horizontal when I get round to installing the brake disks, I will have to undo and remove the shock absorbers again......

Now its starting to look like a proper car!!!!