Wednesday 22 June 2022

Rear Axle Reassembly - Part 5 - Rear Wishbones

 With the hubs done and ready to be installed, I turned my attention back to the chassis and the installation of the rear wishbones.

The rear wishbones are new items supplied by AK.  I bought new inner pivot bolts from SNG Barratt as I ended up "slightly" damaging the original ones whilst stripping down the donor axle/rear sub-frame.

The AK setup also requires the use of a spacer tube; these didn't come with my X300 axle but I managed to source a spare pair from Ben at Simply Performance.

Looking at the AK Build Manual, the installation of the wishbones is fairly straightforward.  The (new) outer pivot bolt is passed through the rear of the new wishbone, through two washers, through the rear differential tie bar, through the spacer tube, through the front wishbone mount, through two more washers, and finally, through the differential pendulum mount before being secured with a final washer and bolt.  The pivot bolts were given a liberal coating of copper grease prior to installation.

Simple.
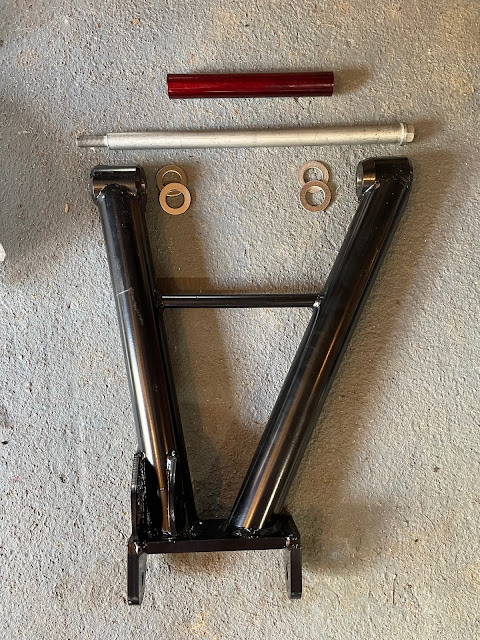
Wishbone, new pivot bolt, washers and spacer tube

Well, it was simple, apart from a couple of small issues.

First, the AK Build Manual calls for the use of 1 1/2" by 7/8" washers.  But for some annoying reason, they don't supply these washers.  This is a complete pain because despite exhaustive internet searching I could not find this size washer outside of the US of A.  Fortunately I was prepared.  Having read Richard Chippendale's blog and his solution of using M22 washers instead, I had already pre-ordered a pack of suitable replacement size washers.

Close-up of wishbone mounting configuration...

...and view of installed wishbone.

The second issue is that the AK Build Manual suggests the use of an M12 is needed for the end of the inner pivot shaft.  This is incorrect.  Had I read/remembered Richard's blog better, I would have already known this.  But I was not prepared for this eventuality, and so there was a short break in the proceedings for another order with SNG Barratt.

(I couldn't actually find the original fulcrum nuts from my donor axle.  But even if I had, they were so rusty from when I removed them, that I wouldn't have wanted to re-use them in any case.)


The nuts are actually I believe an M14 thread.  However, the proper Jag nuts have a bit of a skirt on them.  This helps spread the load more evenly onto the washer on the end of the fulcrum bolt; this washer bears onto the metal sleeve in the bushing in the pendulum mount and a "normal" size bolt might cause some distortion of the washer when tightening.

Nice flange...

Once these arrived it was a simple job to pop them onto the end of the fulcrum bolt, along with an M14 washer and fasten up hand tight for the moment.  I will torque these up fully to around 70-75lb-ft / 90-102Nm once the wheels are on and the suspension is partially loaded.

Next step is to get the drive shafts reassembled before I can refit the hub carriers.
Tuesday 21 June 2022

Rear Axle Reassembly - Part 7 - Pig Pen, this here's Rubber Duck...

Before the rear hubs can be reinstalled into the carriers the brake backplates, which hold the handbrake mechanism in place, need to be fixed to the hub carriers.

In my view, there is a distinct flaw in the Jaguar design for this set-up.  The hub carriers are aluminium and the brake backplates are steel.  Fixing the two dissimilar metals together results in a chemical reaction, known as galvanic corrosion.  This accelerates the breakdown of the natural coating of the aluminium and produces aluminium oxide (remember all that white crusty crud under the backplates when the hubs were stripped down).

This process is exacerbated by moisture and salt (like er...road salt) and so to ensure that the conditions for this galvanic corrosion are fully optimised, the Jaguar engineers decided to leave the aluminium mating face of the hub in a rough cast form to really allow the ingress of water, dirt and salt to take place, and then to ensure that it remains trapped in place to do its evil deed. 

A haven for dirt, debris and road crud!

A number of solutions have been proposed on the various build blogs that I have perused; including just bolting it all back together, a liberal application of copper grease, or the use of the dreaded RTV silicone sealant.

I decided to try an alternative solution and go with a rubber gasket.  This should keep the two metal components separated to reduce the opportunity for galvanic corrosion and also, hopefully, keep water and crud out of various nooks and crannies resulting from the rough cast face of the aluminium hub.

I made up an initial paper template. The centre hole was sized by placing the backplate on a sheet of paper and simply running a pencil around the edge of the hole.  This was cut out using a sharp knife and placed onto the hub.  Using a suitably greasy finger, I rubbed over the paper to trace the shape of the edge of the hub and the screw mounting holes.  The template was then completed by trimming the outer edge and screw holes.

Why you shouldn't wash your hands.....

Final template

I then stuck the paper template down onto a sheet of 1mm thick rubber sheet (purchased from that well-known internet auction site).  I used a scalpel to cut around the edges of the template and create the rubber gasket.  The template was stuck down a second time and the process was repeated to create a second gasket.

Template stuck down onto rubber sheet...

...and trimmed to create gasket.

A perfect fit!

Now I have sorted this issue I can press on with reassembly...


Update - Project Snake is still alive (again....)

So in May 2021 I put up a post of hope - hope that I would get some serious work done on the Cobra.  It didn't happen...

I did a few bits here and there (some belated posts to follow) but I had a major distraction with the decision to remove some existing timber decking in my garden and replace it with some stone paving.  As always, the project spiraled and took about 10 times longer to complete than planned (actually at the time of writing it is still not technically complete as the lawn still needs to be relaid...).  Still, my wife is now very happy so maybe, with what is left of this year, I will be able to crack on with the Cobra!

Update photo - the eagle-eyed will spot that it looks almost exactly the same as the update from last year - just wearing slightly more dust!