Showing posts with label Misc. Show all posts

Saturday 8 May 2021

Update - Project Snake is still alive!!

 So I haven't posted anything on this blog for some time now - the last update was in August 2020.  There is a reason for that.  It's a simple one.  The fact is, I haven't done very much on the car at all!!

The year of 2020 turned out to be a very strange one, as I sure it has been for everyone.  The year of COVID-19, lock-down, working from home, a false dawn followed by another lock-down, a non-family Christmas and finally some hope on the horizon with the development of a vaccine.

I was fortunate enough to be able to continue to work from home.  But despite saving myself typically 3 hours a day by not having to commute into London, I have still not managed to find and use those hours to do anything constructive!  Work seemed to expand to fill my time and blur the boundaries between work life and home life.

I did manage to get a number of projects sorted around the house, which will hopefully get me in my wife's good books and allow me to justify some serious garage time in 2021, but largely for last year, Project Snake was relegated to the bottom of the priority list.

That's not to say I did absolutely nothing.  I did make a start on reassembly of rear hubs and I did a bit of planning and made some firm decisions on brakes and gearbox and have ordered a few parts in ready to crack on.

Hopefully there will be a few more regular updates coming this year and a lot of progress on the build!  Fingers crossed!

First job however is to have a bloody good tidy up of the garage - over the course of the last year the cobra body shell seems to have disappeared under various boxes and general detritus...

There's a Cobra in there somewhere...!!!


Saturday 20 April 2019

Christmas Holiday Projects - Powder Coating Stand


I have decided to try DIY powder coating the various donor parts that I will be re-using.  My plan is to buy the Eastwood Hotcoat Dual Voltage powder coat gun from Frost Restorations (although at time of writing it is still out of stock).

When watching the Eastwood powder coating guide on YouTube they used a cunning stand to clamp an oven shelf (with parts to be coated hung from the shelf) allowing easy transfer into the curing oven.


Powder Coating Stand - photo courtesy of Eastwood.com

Allows transfer of oven shelf and parts directly into
oven for curing - photo courtesy of Eastwood.com

I thought it was be a good project to try and make my own stand as it would allow me to brush up (learn!) on some of my metal working skills prior to using them in anger on the Cobra build.

I bought the main metal sections, 3 No 1m lengths of 25mm box section, a 1m length of 50mm by 3mm angle section and a 1m length of 25mm by 3mm plate from Ebay, some M8 roofing bolts from Toolstation and some M8 Thumbwheels and 25mm square inserts from Ross Castors.


Selection of steel sections

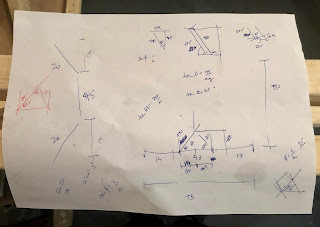
I used the proverbial back of a fag-packet to work out dimensions, angles and hole positions, testing my memory of trigonometry to the full!


Detailed Engineering Fabrication Drawing....

I cut the steel sections to the required lengths / angles using a Rage Evolution Mitre Saw.  I have used the saw many times previously for timber but this was the first time I had tested it out on metal.  Have to say it cut through the various steel sections very easily and with nice clean cuts.  Usual H&S rules apply - cutting metal does result in lots of tiny shards of metal being flung everywhere - wear eye protection and gloves (and I spent the next week picking small bits of metal out of my coat and jeans!!!).


Sections cut to length - starting to take shape!

One of the main reasons I decided to have a go at this project was so that I could have a go at MIG welding.  I bought a MIG welder years ago when I was thinking of attempting some body repairs on my Trans Am but never actually got round to using it!

I have a Siegen Mini-Mig 130 (which is a cheap Sealey brand).  Its quite a small output welder and does not have a fully adjustable power level (2 switches giving four power levels (Min I / Min II / Max I / Max II)).  As I bought it with the intention of only welding thin body panels I wasn't that bothered about a higher power machine at the time.


It was a bargain 10 years ago....

I did the obligatory self-learning MIG welding course by watching a number of videos on YouTube and feeling confident headed to the garage to set up the welder and hope, that after 10 years of gathering dust in my garage, it actually worked!

I had some old lengths of 5mm steel plate lurking in my garage and used a couple of these to practice laying down a decent weld bead.  Well the good news was that the welder worked.  The bad news is that welding is not as easy as it looks!  Lots of sparks and spatter but not a lot of weld!  Eventually I concluded that the lower power settings were a waste of time, and after a bit of twiddling with the wire speed control knob and experimenting with the angle of the welding torch I finally managed to produce something that looked like a reasonable bead of weld.  Time to start welding up my project!

I started by trying to weld an end cap on the bottom of one of the box sections. I cut a square section of plate and tack welded it in place.  So far so good.  However the first attempts to weld along the joins were disastrous.  The results were back to being blobby and splattery even though I had not changed the settings on the welder.


End cap tack welded in place

I thought I had solved the issue when I realised that I had run out of gas!  I was only using a small disposable Argon / CO2 gas cylinder and clearly my extensive test welding had exhausted the supply.  However even after buying a couple of new cylinders, I still could not get a decent weld; still blobby and grinding down the weld revealed holes and poor penetration.  


Not the best advert for welding...

I pressed on, welding and grinding and rewelding and regrinding until I was happy enough with the end result (which used another whole bottle of gas to weld on two end caps!!!!)


After extensive welding and grinding....

It was then that I realised that I had got a slight twist in the cable leading to the welding torch which was enough to cause the wire feed to be a bit erratic.  Once I untwisted the torch, weld quality suddenly improved - this is a relative statement, the results were far from what I would call good, but a definite improvement!  A lesson learned - keep the cable from the welder to the torch as straight as possible!

Next step was to drill the holes in the bottom of the main section, the bottom brace and the bottom legs so that I could get the position of the plates either side of the bottom brace in the correct place.  Using my precise engineering drawing (?!) I marked the hole locations with a metal scribe and centre punch.  I drilled 4mm pilot holes and then opened out to 6mm and then to 8mm.


Drilling....

Drilled....

Final steps were to weld two sections either side of the bottom brace, to weld up both of the bottom legs and the weld the angle section onto the top of the main leg.  Although my welding was still a little untidy, once ground down the joints all looked pretty solid.


Plates welded either side of bottom brace
Bottom Legs welded together

Almost looks like a stand!

I tack welded a couple of nuts onto the bottom brace and onto the top shelf bracket then gave everything a wipe down with white spirit and sprayed it all with 3 coats of Hammerite Smooth.

I am actually pretty chuffed with the result - looks just like it was supposed to (which is always a bonus!!) and the thumbwheels and end caps add a nice professional looking touch (just don't look too closely at the welding).


Friday 1 February 2019

I must be going nuts.....

Unfortunately delivery of the AK chassis / body has coincided with my wife's implementation of a post-Christmas revised domestic fiscal strategy (i.e my spending has been capped....).  

In the meantime I decided to sort out the various nuts and bolts that AK supply with the new kit and try and work out what else I might need to buy (once funds are released!).

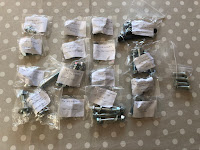
AK supply two packages of nuts and bolts.  One is identified as 'Body Bolts" and the other as "Generation II - Nut / Bolt Kit".  They also include in the documentation that comes with the kit, two lists detailing the contents of these two packs.


So all I needed to do was check the contents of the bags matched the lists - simple.  Well, not as simple as it sounds.

Firstly the nuts and bolts just come in a variety of bags with no indication of sizes (and unfortunately my eye is not practiced enough to know a M8 from an M10 by sight alone and just to mix it up a bit some of the bolts are metric and some are imperial).  

So I spent a happy hour or so with a set of callipers and a ruler trying to identify  all the various bolts and tick them off against the supplied lists.  I also had the AK build manual to hand to assist (although the fact that the AK Nut and Bolt list is largely in metric but the AK Build Manual refers to many of the washers in imperial sizes does confuse things slightly).

Having (successfully?!) identified all the fixings, I separated them into individual labelled bags, so that as the build progresses I can identify all the fixings needed for each stage. (I did seem to be short of 4No 35mm by 14mm washers - but on the plus side I had a extra 2No M10x30 bolts and an extra 14No M8by25 bolts!!!).


It seems that the nut/bolt kit is pretty comprehensive - containing the majority of the required fixings for the chassis / suspension build stage.  So I suppose I was a bit surprised / disappointed that they couldn't supply all the required fixings.  I know some will be specific to the year / model of the donor vehicle and get that they can't cater for all cases.  

But, for example, the build manual indicates that some M6 machine screws and M6 washers are needed to set the caster angles on the front suspension but these are not included. Neither are the M10by70 bolts, M10 washers and M10 Nylocs required to fix the steering rack.  Or the M12 Nylocs to fix the rear control arm bracket onto the diff......

Maybe I'm being overly picky - but having provided 95% of the fixings, it would be much effort (or cost) to supply the remaining 5% of fixings where the sizes are known (and not dependant on donor parts).

Wednesday 2 January 2019

Christmas Holiday Projects - Body Support Frame

Despite being a bit behind with cleaning and painting the donor parts, with the AK body and chassis arriving early in the New Year I needed to get the garage ready to receive the kit.

My plan was to build a timber frame to store the body over the chassis; the idea being that the body/frame can be moved out of the garage to allow work on the chassis to proceed.  The idea came from another AK owner - Stuart Holden - and I have basically taken his frame layout as per the plans on his blog (although I did change some of the dimensions having taken my own measurements of the frame AK use to support their bodies in the factory).

General layout of body frame - courtesy of Stuart Holden

The AK body is supported at the front under the footwells and the kick-up at the rear sits under the boot floor.  The whole frame is wide enough to span over the chassis and sits on casters to allow it to be moved out over the chassis to allow working space.

I bought fourteen 2.4m lengths of 38mm by 63mm timber studding from Wickes, M8 coach bolts, coach screws (80mm and 60mm length) and washers from Namrick and some heavy duty casters from Screwfix.

Christmas Holiday project materials!

Timber cut to size

Fixings 

I started by making the two end frames.  All joints were bolted and glued for strength.  I then joined the added the sides and the diagonals - again all bolted and glued for strength.

I recommend checking constantly that all the elements are square and true (check once, check twice and check again) before and after fixing!.  Despite all my careful measuring and marking I did have to refix one of the diagonal bracings on the front frame, as although I checked the squareness several times before fixing, after fixing, one vertical was clearly out of plumb by a significant margin!! 

Front sub-frame completed...

...and rear sub-frame completed
Subframes joined, braced and casters fitted

The finished frame is nice and solid and hopefully be fit for the intended task (time will tell).  It does look suspiciously like a double bed frame - a point which my missus remarked upon and that it would be quite useful with all the time I would be spending in the garage...not sure what she is getting at!

It is a slightly snugger fit in the garage than I was hoping for so I will need to do a bit more rearranging to give a bit more room down the sides of the frame.  But a days work well spent I think!

Bit tight down the sides......

Early Christmas Present....

Over Christmas I am planning to build a frame to support the AK body while I work on the chassis.  I wanted to check the measurements of the frame that AK use to support their bodies in the factory when they come out of the molds so decided to pay them a quick visit just before Christmas.

When making the arrangements to visit, Carla told me that I must have been a very good boy this year as Santa had a surprise for me in the workshop!!!!

When I arrived at AK I was greeted by the obligatory cup of tea (and chocolates as it was the festive season), and then Wendi showed me our AK body in the workshop (excited) and then took me down to the powder coaters to see the chassis being finished off (even more excited!) - roll on Jan 11th 2019!!

My Gen III chassis fresh out of the oven!

AK body ready and waiting!