Showing posts with label Radiator. Show all posts

Sunday 10 March 2024

Couple of Minor Jobs - Part 2

I have finished off a load of small jobs that are not really worthy of a post all of their own.

The first was to add an earth strap between the engine and the chassis.  Just to be on the safe side I bought a 50mm2 earth cable (which should cope with 345 Amps), with a 10mm lug on each end from PCS Cables.  This was bolted into a convenient hole in the engine block at the nearside front.  I drilled and tapped a hole in the top of the chassis rail and ground off a bit of the powder coat to ensure a good contact.

Engine Earth Strap 

I also put the final hose finisher on the crankcase breather hose.  The hose finisher that I originally bought is still hiding in the garage somewhere, probably hanging out with a 10mm socket, and laughing at me.

Breather hoses completed!

I have given the front of the radiator a couple of coats of Eastwood Radiator paint in satin black.  The bare aluminium finish was not quite in keeping with the "stealth" look that I have in mind for the finished car.  I should have done this before I installed the radiator onto the chassis, but I managed to mask up most of the front with newspaper and a couple of old blankets to protect everything from any over-spray.

Radiator masked up prior to painting...

...and after painting and masking removed

I have also added oil to the rear differential and the gearbox as it is far easier to do this while access is good rather than leaving (or forgetting) until the body is on.

I bought 2 litres of Castrol Transmax oil which is specially formulated for limited slip differentials and used a funnel and a length of clear PVC tube to fill the differential with oil.  I managed to get almost all of the 2 litres into the differential before the oil started leaking back out of the filler oil.

Differential oil

Funnel and PVC pipe filling arrangement

For the gearbox, I bought 3 litres of Motul Dexron III oil which is the recommended fluid for the Tremec T56 transmission.  I used the same funnel/pipe setup to fill the transmission and again managed to get almost all of the 3 litres in before the oil started weeping out of the filler hole.

Transmission fluid

Filler hole for T56 transmission

I also have finally got around to welding up the various threaded bungs I have added to the chassis for the fuel tank, gearbox and exhaust mounts.  I treated myself to a day welding lesson at The Machine Shop to try and get the hang of TIG welding. I'm still not "stacking dimes" but at least I managed to master the art of getting a bit more heat and penetration into the welds.  As the body will sit on most of the locations of these bungs, I ground them down flush to the chassis rails and then treated them to a couple of coats of POR15 rust preventative paint.

Powdercoat ground off around area to be welded

A dodgy stack of dimes...

...after grinding welds down...

...and after two coats of POR15


Sunday 18 June 2023

Heating and Cooling - Part 2 - Radiator Plumbing

 A few weeks back I took a trip to AK to pick up various shiny parcels and to give my credit card a sharp intake of breath...

The shiny parcels included my side pipes and headers, but also the air inlet pipe, the radiator header tank and the top and bottom radiator pipes.  

This meant that I could get on with plumbing in all the radiator hoses.

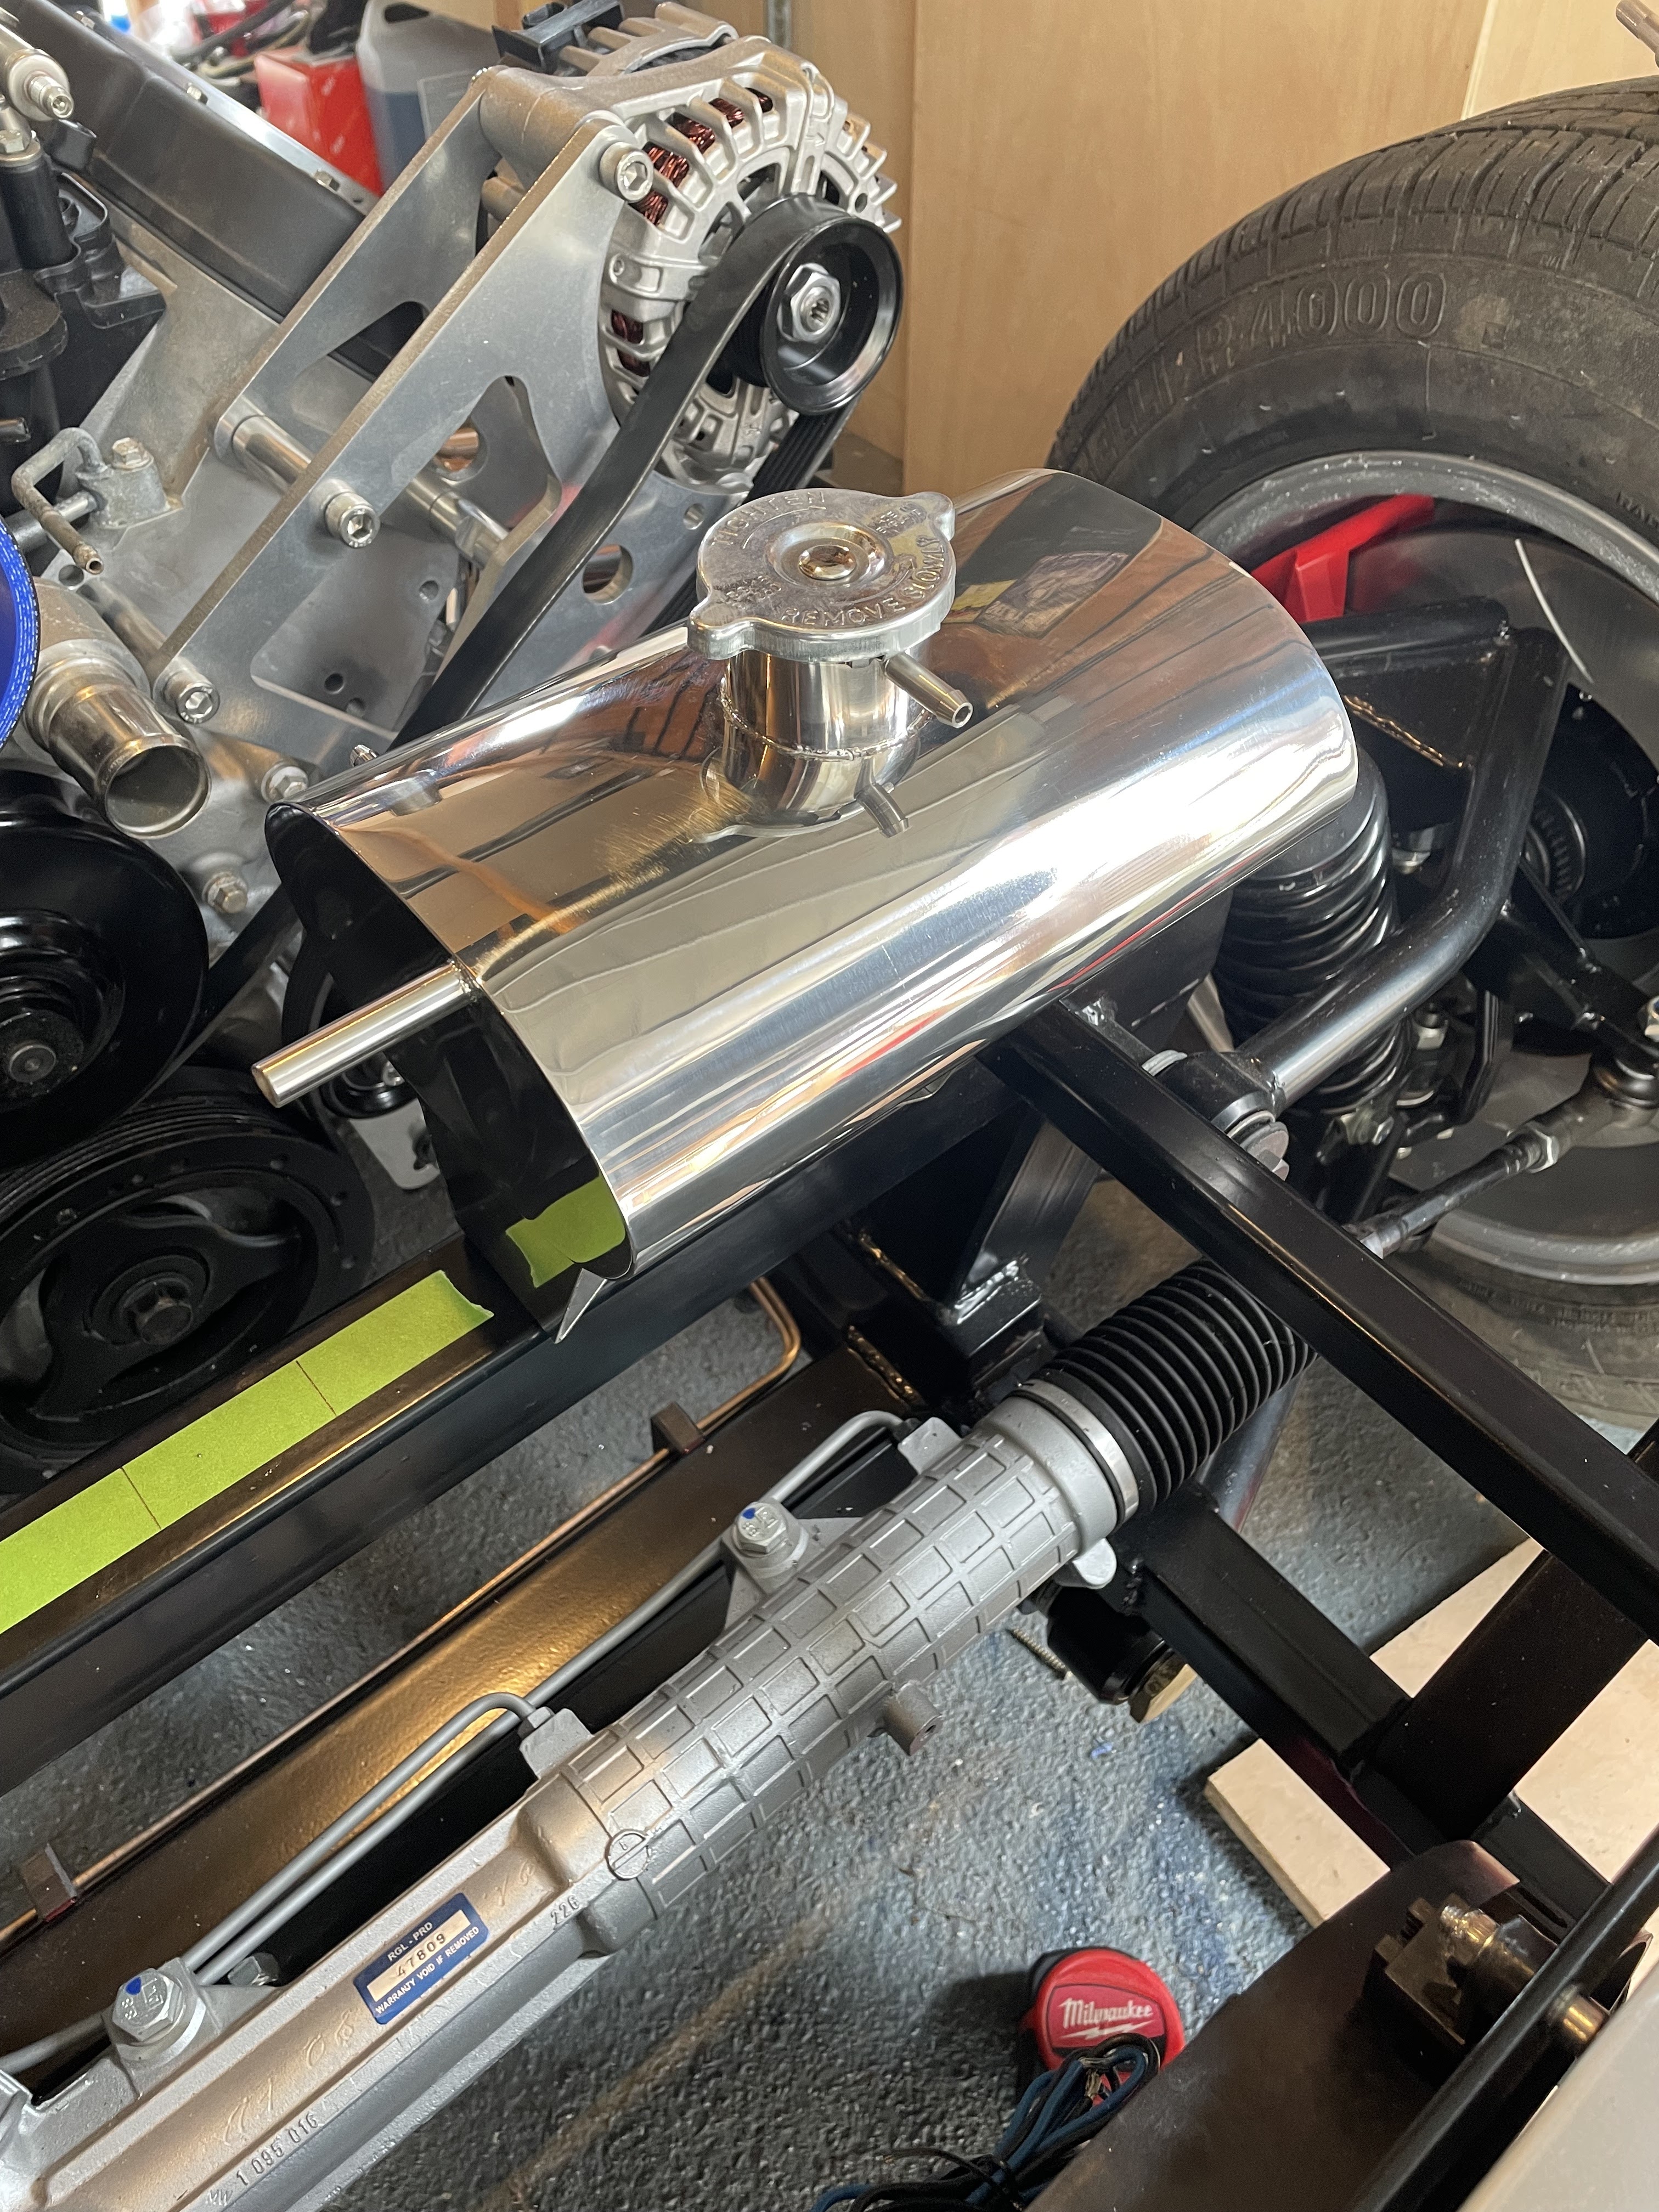
Shiny new radiator header tank

The first job was to swill the header tank out with some water to remove any detritus that remained lurking within.  I then filled the tank with water and bunged up the bottom outlet pipe for an hour or so just to check that there were no pinholes in the welds that would leak.

No leaks from welded joints!

The header tank is mounted to a cross-member at the front of the chassis.  I marked the centreline by measuring between the two radiator top-frames and then marked two lines 50mm on either side to allow for the diameter of the air inlet pipe.  I then marked another line midway between the "edge of inlet pipe" line and the radiator top frame and then centred the mounting holes for the header tank on either side of this.

Centres for mounting holes measured...

I then centre-punched the holes, drilled out to 6.8mm, and tapped for an M8x1.25 thread.  The header tank was then installed using 2No. M8x20mm stainless steel bolts with spring washers.

Header tank installed

The radiator top hose was connected up next.  AK supply a stainless steel section of pipe which is joined to the radiator and to the engine with some lengths of flexible hose.  I had measured the stubs on the engine and the radiator to determine the hose bore needed and had purchased some 35mm bore silicone hose.  The AK stainless pipe is actually around 38mm outside diameter, so while the 35mm bore silicone hose could be squeezed onto the stainless pipe, it was a tight fit.  To my mind, however, this was the right thing to do; using a larger bore pipe to fit onto the stainless pipe would result in a looser fit onto the radiator and engine stubs and, while the silicone hose might be compressed enough to seal when tightening up the jubilee clips, I think having a tighter fit in the first place presents less risk of leaks.

AK supplied Top Radiator Pipe...

...installed in place with a short length of silicone hose at each end

Thinking ahead I angled the tightening screws on the jubilee clips securing the silicone hose at the radiator end so that in future they can be accessed from the side or below; once the body is on, access from the top will be impossible and it's very tempting to just secure these clips with the screws pointing upwards!  All the hose clips were tightened to 5Nm torque and rechecked again after 30 minutes or so to allow for any relaxation of the silicone.

Next up was the connection between the header tank and the small pipe on the top of the engine which connects to the water galleries in the cylinder heads, and the header tank overflow pipe.  I used some silicone hose with a bore of 6.5mm for both of these.  I secured the overflow pipe with a couple of P-clips secured with some M6 button screws to the radiator top frame and the bottom chassis rail.

Small diameter pipe between header tank and engine

Overflow pipe secured using a couple of P-Clips

The bottom radiator hose was slightly more tricky to fit.  The bottom hose has three connections; one to the bottom of the radiator, one to the bottom of the header tank and one to the thermostat housing on the engine.  The connection to the radiator bottom outlet was made with a length of 35mm bore silicone hose (same as the top hose).  The connection to the header tank was made with a length of 25mm bore silicone hose. I needed to support the bottom stainless pipe roughly level to be able to judge the correct length to cut the required length of hose.  I erred on the side of caution and initially made the hose too long and cut it down 10mm at a time until the right length was achieved.

The connection to the engine thermostat was more involved.  Other builds I have seen have just used a 90-degree silicone hose bend between the thermostat housing and the vertical section of stainless steel pipe (the angle is slightly more acute than 90 degrees but the silicone hose gives some flexibility to adjust).  

I had ordered a 90-degree 35mm bore silicone bend thinking this would suit the purpose.  Unfortunately, I discovered two problems.  The first was that the leg lengths on my 90-degree bend were too short so when the bend was slid onto the vertical stainless pipe, it didn't reach the thermostat housing.  The second problem was that the diameter of the thermostat housing is 42mm and no amount of cajoling would get the 35mm bore hose onto the outlet.

My solution was to order a 38/35mm silicone reducer plus a couple of alloy 35mm hose joiners assembled as shown in the photos below. Ideally, I would have ordered a 40/35mm reducer but Merlin was showing it out of stock for 6-8 weeks and I wasn't prepared to wait that long.  You might ask why I didn't just do the whole section in 38mm bore hose, which might have been simpler, but as I had already bought the 35mm 90-degree bend I wasn't too keen on just binning it.

AK Bottom Radiator Pipe

My solution involves a reducer, some joiners and a 90-degree bend...

...all fully assembled

As installed on the car

The hose from Header Tank to the lower Radiator Pipe

The last hose to fit was the pipe from the header tank to the top of the radiator.  Unfortunately, I hadn't thought this one through fully; the routing of the pipe is quite tight and very dependent on the position of the wash/wipe water tank, which I had not yet ordered.  So there was another short delay in the proceedings while I ordered the second tank from AK Sportscars and awaited delivery.

Once it arrived I fitted it in the same manner as the radiator header tank.  I could then route the final silicone hose, fix a P-clip in an appropriate spot, and that is another job complete!

Routing of the final section of radiator hose

Not quite relevant to this post - but both bling tanks are in place!!


Sunday 5 March 2023

Heating & Cooling - Part 1 - Radiator and Fan

Installation of the radiator and cooling fan was a reasonably straightforward job.

I had purchased the AK aluminium radiator when I was up at their open day last September; as they had one in stock it seemed rude not to take it away with me!

I went for a Davies Craig 16-inch unit from Merlin Motorsport for the cooling fan.  This pulls a huge 2120cfm so it should keep my LS7 nice and cool.

The first step was to install the lower radiator mount, which is supplied as part of the AK chassis kit and is fitted with 4No. M8 bolts, washers and nyloc nuts.

Lower radiator mount fitted

There are two pins on the bottom of the radiator which are approximately 10mm in diameter and 20mm in length.  The proper way to sit the radiator onto the lower mount is to purchase some rubber top-hat washers; these slide over the pins and then locate the bottom of the radiator into the two 20mm diameter holes in the lower mount.  Other builders have used a variety of alternative solutions including a couple different diameters of rubber or silicon hose to create the stepped bushing.

I knocked up a couple of top-hat bushes from some 30mm nylon bar which hopefully will do the job.

Two bushes machined from some nylon bar 

Bush in place and keeping radiator from sitting directly onto lower mount

The upper radiator mount is attached to the top of the radiator using 2No. M6 bolts and washers and to the chassis using 2No. M12 bolts and washers.  I needed to clean out the threads in the chassis mounts with an M12X1.75 tap to remove the powder coating before the bolts would thread in easily.  The holes in the top radiator frame also needed some work with a file to remove the excess powder coat.  Initially, I assembled the top mount and radiator to check the fit but did not fully tighten any of the bolts.

The Davies Craig fan comes with four mounting feet that can be installed in several locations around the perimeter; I was hoping that by using the topmost and bottommost locations I could fix the fan to the upper and lower radiator mounts and not have to rely on zip-ties to secure the fan to the radiator.  

Fortunately, this was the case. I started with the holes in the upper radiator mount and drilled two 6mm diameter holes equidistant from the centre of the mount to match the spacing of the fan mounting holes.  I then loosely fitted the fan to the top mount with a couple of M6x25mm cap-head screws and reassembled the radiator and top mount with the fan to locate the bottom holes for the fan in the lower mount. I put some tape on the lower mount before reassembly and used a broken 6mm drill bit to mark the tape at the hole locations.  I then had to take the whole shebang apart again to drill the holes into the lower mount.  These ended up being lower than I had anticipated but still allowed enough space to install the cap-head screws; I might have had a problem with a normal M6 bolt.

I could then fix the fan to the upper and lower radiator mounts using the M6 cap-head screws, washers and some nyloc nuts.  I had to insert the cap-head screws the wrong way around from what I would have preferred to prevent the excess length of the screw from rubbing against the radiator; this meant that I had to tighten up the fan fixings fully before reinstalling the radiator.  Luckily there was enough play in the mounts for this not to be a problem.

Fan fixed to upper and lower radiator mounts

I could then reinstall the radiator, and fully tighten up the bolts securing the upper mount using a dab of blue Loctite for good measure.

A quick check showed that I had some clearance between the fan mounting bolt heads and the radiator so all was good!

Radiator back in and fully secured...

...with the cooling fan snugly sitting behind!

Free air between fan mounting bolts and radiator!

It's starting to look more like a proper car every day!!