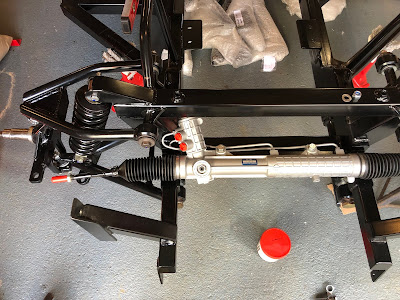
Again this should have been fairly straightforward - offer rack up to chassis, install nuts and bolts (M10 by 70 bolts, M10 washers and M10 Nylocs - not supplied by AK) and job done!?
AK make the point in the build manual to check that the pipes on the new rack do not foul on the chassis. I was already aware from Richard's build progress that he had run into problems with this and I therefore was betting I would have the same issue.
True enough when I did the initial trial fit, one of the the two pipes on the rack was touching on the end of the off-side chassis rail.
 |
| Initial Trial Fit of Steering Rack.... |
 |
| ....showed fouling of pipe on end of chassis rail |
Another consultation with AK followed - Jon didn't see this to be an issue as the rack is solidly fixed to the chassis and can't move. While this may be true I was still concerned that while the rack and chassis might not move relative to one another, vibrations transmitted through the chassis might still cause some slight rubbing of the pipe on the edge of the chassis rail which could eventually lead to failure of the pipe. So I decided to try and get some suitable clearance between pipe and chassis.
I tried loosening the offending pipe to see if it could be moved slightly forward to provide some clearance - but that didn't work. I also removed the pipe entirely to see if I could alter the bend slightly to provide clearance. While this did look possible I was concerned that this might alter the length between the pipe unions and put some stress on the bends at each end.
In the end my fix was rather simple. I wrapped a piece of spare 3mm steel strip in a towel to protect chassis and pipe, placed it on the end of the offending chassis rail, placed the rack into position and then fully tightened up the bolts. The act of tightening the bolts, caused the steel spacer to push the pipe back out of way and provided a suitable amount of clearance.
 |
| Clearance granted! |
I then did a final installation of the M10 securing bolts, with some thread lock on the nut end for good measure.
The ball joints are then screwed onto each end of the rack - the AK Build Manual recommends 14 full rotations of each ball joint as an initial setting. You then need to measure between the centre of each of the ball joint studs and make adjustments as necessary (making sure to adjust both ball joints the same amount) to achieve a measurement of 47.5" between studs.
The ball joints are then secured to the uprights with M14 Nyloc Nuts (supplied) although I have not fully tightening these at present a) because I think I will add an M14 washer under the nut and b) I will leave final tightening until I have checked and set toe angles at some point in the future.
 |
| Steering Rack Installed |

No comments:
Post a Comment