Saturday 20 April 2019

Front Axle Part 4 - It’s a Shocker

With the caster angles set, and new lower front wishbone shafts delivered, the next task was to carry out the final reassembly of the front suspension and install the front shock absorbers.

This was a simple matter of removing each of the wishbone shafts in turn, being very careful not to dislodge the wishbone and washers.  I then stuffed a goodly amount of copper grease into the front end of each wishbone and applied an equally liberal coating of copper grease to each of the wishbone shafts.  I then re-installed the shafts, which pushed the plug of copper grease through to the rear of each wishbone (hopefully aiding to ensure the full length of the wishbone and chassis tube is greased up).  The excess grease was removed with a wad of paper towel.

Copper Grease "Plug" at front of Wishbone
A generously lubricated shaft.....(minds out of the gutter please....)

For the lower wishbone shafts, I purchased some additional M22 washers from Westfield Fasteners to put under the bolt head to accommodate for the slight extra length of the shaft.  I also wasn't happy with the way the M14 castellated nut sat on the end of the inner sleeve of the lower wishbone bushing, so I also bought some extra M14 washers for the nut end of the shaft.

With all four shafts, greased, reinstalled and nuts tightened up hand tight, it was time to install the front shock absorbers.

As it seems to be with this Cobra building adventure, not all tasks are as simple as they should be.  I started by test fitting the 7/16" by 2.5" front shock bolts (supplied by AK) in each of the holes.  All were fine, except for the nearside lower shock mounting, which would not pass through the bushing which is pre-installed in the lower wishbone.  Closer inspection revealed that the inner sleeve of the bushing was slightly out of round at the front (the end was also a bit ragged which I was not altogether happy with either).

Slightly flattened lower shock mounting bushing

I decided to try and ream the inner bushing out with an 11mm drill bit, which appeared to be a great idea, until about the last mm of travel on the bit, which caught on the end of the inner sleeve and tore it out of the rubber completely!

B*gger......!

Unintentionally Disassembled Front Shock Bushing...

However this unintended action did reveal that the inner sleeve did not look in very good shape at all; not only was the front edge all ragged but it looked a bit distorted / crushed in the middle.  

A quick email to AK and Jon offered to press in a new bushing for me - this did mean that I had to remove my newly installed lower wishbone from the chassis, but that's why I hadn't fully tightened up any of the nuts yet wasn't it?

A quick trip up to AK, a cup of tea and a chat with Jon later, and I was returning home with a new bushing installed.

New (better looking) lower shock bushing courtesy of AK

Then it was a simple matter of applying copper grease liberally to the bushings and the shock mounting bolts and installing shocks on both sides.

Off-side front Shock installed

Final job was to tighten up all the bolts to the recommended torque settings (as per the Haynes Manual for the Jaguar XJ40).  For information, these are as follows:


I was unable to get a socket and my torque wrench onto the lower balljoint stud nuts, so I just tightened these as much as I could by hand using a spanner.  

Also with the lower wishbone pivot nuts, I ended up torquing these to around the correct value but then had to back them off slightly to be able to fit the split pin through the castellated nut and hole in the shaft.

Lower Front Wishbone Shaft - Retaining Pin inserted and secured

I also found when tightening the upper shock bolts that the bolt head was starting to cause the powerboat underneath it to crack slightly.  AK only provide a single washer per bolt (which I had put on the nut end) so I bought some additional 7/16" washers for the bolt ends and re-installed and re-torqued bolts to specification.

As each bolt is torqued down, I consider it good practice to mark it in some way.  I did this using a small blob of nail varnish on the bolt and nut.  I spent many happy hours in the local chemist perusing the shades before I settled on Danny Boy Blue.....


Other shades are available....


IMPORTANT NOTE

I have not been carrying out the assembly of the front suspension in exactly the same order as the AK build manual, mainly because I am not yet ready to install the front hubs and I have yet to refurbish my front brake callipers.

This does mean that I missed out a key stage prior to installing the shock absorbers which is to set the front camber angles (i.e the angle between the vertical axis and the steering axis when viewed from the front of the car).  The AK Gen III wishbone have elongated holes in the upper wishbone ball joint mounting for this adjustment.  However the camber is measured by checking the vertical angle of the brake disk with the wishbones set horizontally.

Now I had remembered that I needed to set the camber angle, hence I have not yet fully tightened the upper ball joint mounting bolts.  However, in order to get the wishbones horizontal when I get round to installing the brake disks, I will have to undo and remove the shock absorbers again......

Now its starting to look like a proper car!!!!

Front Axle Part 3 - Keeping a Level Head

Having initially assembled the front wishbones and stub axles, the next step is to check the caster angles on the uprights and adjust if necessary by redistributing the washers between the wishbones and the chassis.

Technical bit - the caster angle (as opposed to the camber angle) is the angular displacement of the steering axis from the vertical, the purpose of which is to provide a degrees of self-centreing for the steering.

Before checking the caster angles, the first step is to level up the chassis and the wishbones.

My garage floor is far from flat, level or even, so this apparently simple exercise took a fair amount of time.

The wishbones need to be horizontal for this step.  Expecting to to have to do some redistribution of washers I did not fully tighten the wishbone bolts.  This meant that I needed to support the wishbones on a another couple of axle stands.  

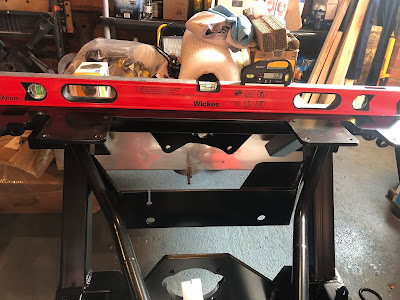
Then I checked the chassis was level side to side, by placing a spirit level across the chassis rails at the front.  

Wishbones supported - checking level across chassis

My chassis is supported on axle stands with some off-cuts of carpet between the axle stand and the chassis to protect the powder coat.  To get chassis level I jacked up the chassis and placed additional strips of carpet and / or thick corrugated cardboard on the axle stand to get everything levelled up.

I then placed a level on the top of the wishbones (you can just see the smaller level on the left hand wishbone in the photo above) and levelled the chassis front to back in a similar manner (whilst trying to maintain the level side to side...)

With that all sorted I carried out a final check on the level of the rear crossmember.  I didn't need a spirit level to see that this was far from level - in fact it was about 10mm off across the whole length!!

I couldn't believe that the AK chassis would not be level - so I double checked all the levels again (with both my large and small spirit levels) and deduced that one of my spirit levels (if not both) were not reading accurately.

My iPhone is equipped with a measuring and level app; I have tried the measuring app and found it to be bobbins and didn't expect the level app to be any better (and besides it reads in whole angles only).  So I downloaded the Angle Pro app which does give a reading to a 1/10th of a degree.

In order to check the Angle Pro app was working I also decided to buy a digital level from Amazon (ignoring my previous warning to check that what you are buying is the same as the picture - I received the world's smallest digital level by next day delivery....)

Then using a combination of spirit levels, iPhone Apps and the world's smallest digital level, I started the process all over again.


Level Front Crossmember - CHECK!
Level Rear Crossmember - CHECK!
Wishbone Horizontal - CHECK!! (it was also level front to back)

Time to check the caster angles.  

AK recommend a caster angle of between 6 and 8 degrees (with the aim that both sides are the same!).  AK provide a paper  gauge for this purpose; although the print quality is not great and it does rely on ensuring that a) the edge is actually parallel to the zero line on the gauge and b) the plumb line is fixed exactly at the intersection line of all the angle marks.

AK Caster Gauge in action (Photo courtesy of AK Sportscars)

I wasn't convinced that this was going to give a particularly accurate result so I decided to use digital methods!

The caster angle is measured by butting the gauge / level up against the two M6 screws previously installed into each upright.  The angle is then adjusted by redistributing the various washers on the upper and lower wishbones between the front and rear to alter the inclination of the upright.

The initial AK recommendations for distribution of the various washers proved pretty close in my case and I only had to move two washers from the front of the off-side upper wishbone to the rear to get readings on both sides of 6.7 degrees.  

6.7 Degrees on off-side upright...

...and 6.7 degrees on the near-side upright.  Result!

Now I can get on with the final assembly of the front wishbones and install front shocks.

Sunday 7 April 2019

Front Axle Part 2 - Getting Shafted...

As mentioned in my Front Axle Part 1 post, since my donor lower front wishbone pivot shafts had some minor scoring on them, I had decided to replace them with new shafts.

Scoring on existing Lower Wishbone Shaft

I originally ordered replacement shafts / castellated nuts (Part Number JLM11858) from SNG Barratt.  At the time of ordering these parts were on back-order with a 1-2 week delivery period.

Well after 2 weeks and no sign of my replacement shafts, I gave SNG a call.  They were very apologetic and advised that the parts needed to be supplied by the manufacturer and currently they were unable to provide a delivery date.  Since I really needed these shafts to progress with the build of the front end, I decided to cancel the order and look elsewhere.

Browsing through the internet sites of most of the well known Jag parts suppliers, these shafts appeared to be on 1-2 week lead time with them all and so I assumed I would have the same issue as I had experienced with SNG.

A fellow AK builder, Barry Boughton, who had got in touch with me after reading my blog, had mentioned a company called British Parts UK as a good source of parts.  Having checked their website, they did indeed have the parts and were showing them as in stock.  Rather than ordering over the web and then finding out that these were also on back order, I decided to give them a call.  They confirmed that, yes the shafts were in stock and that they could be delivered in 1-2 days, so I placed my order over the phone.  Job done!

Ok - perhaps not.  

3 days later there was no sign of any shaft delivery and even more strangely to my mind, no email confirmation of my order or delivery.  I gave it a couple more days to be sure, but with still no sign, I gave British Parts a call.  Well thankfully they did have a record of my order, but it transpired that although their system was showing the shafts in stock, when they had gone to the bin in the warehouse it was empty.  The shafts were on back order but the manufacturer was currently unable to advise on a delivery date (obviously the same manufacturer that SNG use...).  I'm not sure when British Parts were actually going to inform me of this, but being less than impressed, I cancelled my order with them.

I was running out of options and getting desperate to press on with the front suspension build.  My final resort was eBay.  Now I'm always very dubious about buying certain items on this well known auction website; many things are obviously low quality, fake, dubious origin, dodgy location etc etc and as these shafts are a major component in the front suspension of what will be a very high powered car, I did not want some inferior quality, cheap, reproduction items.

Having entered the part number into the eBay search box, the required items popped up as being available by seller called E-Type Parts.  All the feedback seemed very positive (and I was even more reassured by the fact that E-Type parts actually has their own website and are based in the UK, in Hull).  So taking a deep breath I ordered two shafts and the corresponding castellated nuts (Part No NL609401J).

Two days later I received a parcel containing two lower wishbone shafts and two castellated nuts.  Success!

Unfortunately not quite....

The supplied nuts did not fit onto the threaded ends of the shafts.  However Jonathan from E-Type Parts was very quick to offer a full refund on the nuts (he was surprised as he also thought that the NL609401J nuts, which are a 9/16 thread, were the correct ones for the shafts).  Between us we concluded that the shafts must have a metric thread, which I managed to confirm by checking with an M14 nut that I had in the AK nut and bolt pack. 

So now I needed to track down two M14 castellated nuts (the nuts are secured to the lower shafts with split pins).  Again not so straightforward as metric castellated nuts don't seem to be that common, but eventually I found a company called Westfield Fasteners who had the offending items for sale and an order was placed.

So now I have the new lower wishbone pivot shafts and nuts, I can get on with the front suspension build-up.

The shafts from E-Type Parts are slightly different to the original donor shafts; aside from the M14 thread instead of the 9/16 thread.  They are also very slightly a different length (longer), which might need some additional washers to accommodate, and the shoulder between the shaft and threaded portion is not chamfered, as on the original shaft, which does make it slightly more difficult to fiddle the shaft into place, through the various bushes and washers on the wishbone assembly.

New Lower Wishbone Shaft (top) vs original donor part (bottom)


Front Axle Part 1 - Wishbone Assembly

Having spent ages cleaning, stripping and prepping bits, it felt like a major step forward to start contemplating actually beginning to build up the new chassis, starting with the front suspension.

First on the list was to purchase some new service parts; I ordered the following from SNG Barratt.


Service parts - not a lot to show for 300 quid!


The donor vehicle top and bottom wishbone shafts both had some slight scoring on them so I decided to replace with new parts.  SNG had the top shafts in stock but the lower shafts are a special item and were on 1-2 weeks back order.

Having read through the AK Build Manual a few times, assembly of the front suspension looked quite straightforward and I was looking forward to some rapid progress......

Yeah right!

The first issue was that my replacement upper wishbone shafts didn't pass through the tubes in the AK chassis.  Not a massive problem, just required some fettling with a round file to remove some excess powdercoat and open out the tubes very slightly.

Next step was to fix the upper ball joints to the AK upper wishbones.  The ball joints sit in a recess in the wishbone and are fixed in place with M10x75 bolts and secured with M10 Nyloc nuts.  

Parts for upper wishbone

I found that there was quite a bit of play between the wishbone housing and the balljoints so I added another M10 washer in-between the two to take up the slack.  The M10 bolts were then tightened enough just to cinch the balljoint housing onto the balljoint itself and stop any movement.  The AK Gen III wishbones have elongated holes to allow camber to be set at a later date so these bolts are not fully torqued up at this stage.

Next was to assemble the offside upper wishbone to the chassis using the new wishbone bolt and 1 1/4" x 5/8" washers as spacers.  AK recommend three washers; I put two at the front and one at the rear for initial assembly.

Bearing in mind that all the wishbones and washers might need to be disassembled and reassembled when setting the front caster angles (reading ahead in the AK Manual) I elected not to grease up all the shafts at this stage, so everything was dry assembled.

First Upper Wishbone done!

The process was then repeated for the nearside upper wishbone.

Next job was to fit the lower wishbones.  As I was still waiting for the new lower wishbone shafts to arrive I temporarily used the original donor shafts for initial assembly.  The lower wishbones use 1 1/2" by 7/8" washers as spacers; on the offside 3 washers are fitted to the front of the chassis and one to the rear.  Getting all these washers in required some gentle application of a pry bar to create enough of a gap to insert the final washer and some gentle taps with a rubber mallet to ease it into the right position.

Offside Lower Wishbone installed

The offside wishbone is exactly the same except that the AK Build manual suggests 3 or 4 washers to be installed at the front of the chassis and none at the rear.  Despite judicious use of the pry bar I could not get close to getting 4 washers in at the front and decided 3 was good enough!

Next step was to fix the lower ball joints to the stub axles.  The replacement ball joints I purchased included the fixing bolts although I needed to buy some M8 spring washers to fix (as per the AK Build Manual).  It is also recommended to apply thread lock to these bolts.  Amazon supplied a disappointingly small bottle of Locktite (at a disappointingly astronomical price.  Note to self - check that size of bottle being supplied is the same as the one in the product photograph...)

Parts for lower balljoint / upright assembly

Assembly was straightforward and fixing bolts were torqued down to 41 lbf ft (as per the Jaguar XJ40 Haynes Manual)

Balljoint fixed to front upright

The stub axle assemblies are then fixed to the upper and lower wishbones.  I tightened the ball joint retaining nuts down sufficiently to fix the alignment of the ball joints but did not torque down bolts fully at this stage.

The last thing to do before setting the caster angles on the front uprights is to tap out the M6 holes in the uprights where the splash guard would be fitted.  These were actually already tapped on my uprights but the threads were not protected during powder coating, so I ran a tap through them in any case just to clean out the threads.

Tapping out M6 holes in front upright


An M6 machine screw is then fitted into the upper hole and another machine screw loaded with M6 washers is fitted into the lower hole.

M6 screw top / M6 screw & washers bottom

Next job is to level up the chassis and wishbones and check front caster angles!

Sunday 17 March 2019

Sand Blasting on a Budget

After derusting and a good session with a wire brush, my first batch of donor parts are looking pretty clean and shiny.  There are however, some traces of the old coating remaining in some of the recesses and within the rough surface of some of the cast parts.

Time to break out the sand blaster.  Oh wait - I don't have a sand blaster.  

Again  the internet is a wonderful place and after some research I found plans for a DIY sand blaster.  Actually I found several plans for full blown blasting cabinets, which was not really what I wanted.  I needed sand blasting on a budget!

First thing on the shopping list was a cheap air gun; this one was less than a tenner on Amazon.


Unfortunately this air gun came with a male 1/4inch BSP outlet.  The thread into the gun is actually smaller than 1/4inch so I couldn't just remove it and screw in a male 1/4inch airline connector.  No I needed to buy a whip hose (another tenner - budget blown!) with a 1/4inch female connector at one end and a quick release male connector at the other.


Thread in airgun is smaller than 1/4inch BSP....
....requiring purchase of an additional whip hose

Then it was time for a drink.  Actually I just needed the bottle and it needed to be one of the ones made of slightly harder plastic than your average drinks bottle.  This Greggs orange juice bottle fitted the bill perfectly, although I did also need to purchase a southern fried chicken baguette and a couple of steak bakes to go with the drink......

One bottle - empty and washed!!

First thing to do was to mark a section on the top of the 100mm long nozzle, roughly in the middle of the bottle opening.


Then with a dremel and cutting disk, I carefully cut through the top of the tube just enough to make an opening in the tube.


Next step was to remove the retaining ring off the bottle lid with a pair of cutters and then to drill a hole through the top of the bottle just big enough to pass the nozzle through with a bit of interference fit.


Then it was simply a matter of screwing the nozzle back onto the air gun, filling the bottle with sand (I used kiln dried paving sand), putting the lid on and hooking it up to the air compressor.

I used a plastic crate as a make-shift blasting cabinet (mainly I thought to prevent covering my driveway with sand), set the air regulator to 100psi and pulled the trigger.....

Surprisingly it did actually work.  Although the first attempt did attempt did result in a small sand storm blasting back of the plastic crate and abrading any part of my exposed skin it could find!

HEALTH AND SAFETY TIP - when sand blasting make sure you wear gloves and eye protection.  The sand goes everywhere and at 100psi makes short work of removing skin!  I also found it necessary to wrap a scarf round my face and do my best Bedouin impression to avoid lasting damage to my mediocre good looks.


Grab your blasters!

The eagle eyed among you will note that the picture above is actually of Sand Blaster Mk2.  The opening I cut into the nozzle of Mk 1 was too large for the kiln dried sand which was so fine it just poured out of the nozzle when angled downwards.  So I used the 200mm nozzle from the air gun kit and cut a much smaller slot.  I will keep Mk1 and maybe try it with some proper blasting media (either grit or walnut shells) which may be slightly coarser.

Mk2 - smaller opening in nozzle tube

The blaster is actually quite effective and removed all traces of remaining paint off the wishbone tie.  Its obviously not as effective as a proper sand blaster and it took a bit of time (not helped by needing to stop every now and then to allow my 2hp compressor to try and keep up!!) but for a budget sand blaster I think its a tick in the box!

All traces of paint around bushes and in corners of
recess removed with Blaster Mk 2!

I still had to sweep up all the sand off the drive though....

Saturday 16 March 2019

Project Snake hits 1000 views!!

I've now had over 1000 views on this blog!

80% of the views have been from the UK, but Project Snake has reached Ireland, South Africa, United States, Australia, France, Belgium, Sweden and Switzerland as well.

Thank you to all who have viewed the blog.  I'd really like to get some feedback and hear from anybody who is in the process of building their own car (whether it is an AK or another manufacturer).  If you have your own blogs, on-line build diaries etc please send me details - I'm really interested in other peoples tips and build experiences.

As I have said before I hope my blog is of some interest and would really like to get some feedback - feel free to comment or send me an email.

In the meantime I hope you all keep coming back and thanks for looking!!

Friday 8 March 2019

Rear Axle Strip Down - Part 6

I have to admit trying to get this last taper bearing out of the rear hubs is seriously starting to get on my..........

Further internet research suggested welding a plate onto the front of the bearing which would a) allow the use of a straight drift to drive the bearing out from behind (rather than using an angled implement to try and get into the slots behind the bearing) and b) the weld apparently acts to shrink the bearing slightly making it easier to drive out.

Deciding to give this method a try, I purchased some a 300mm length of 20mm by 5mm steel strip and a 200mm length of 20mm did steel bar from eBay.  


Using one of the taper bearing races that I had managed to extract as a template, I cut a length of the steel plate and ground down the ends to fit inside the bearing race (including chamfering the ends to account for the taper).

Marked up.....
Cut.....
Grinding....

Final Result

I decided to tack weld the steel bar onto the back of the plate to make a more solid piece to be able to hopefully hammer the bearing out so I also chamfered the bottom of the bar slightly to facilitate tack welding.

Ready for welding...

Plate tacked onto bar...

I then attempted to weld the plate into the offending bearing race.  This proved to be more difficult than I thought.  Not sure whether it is because the race is hardened steel or that my welder is not powerful enough (or both), but the first few attempts to weld the plate in resulted in a lot of weld being deposited on the plate and very little on the bearing race.  I had to try several times, grinding off the weld deposit from my make-shift drift and rewelding.  Eventually I managed to get a welded connection of some sorts between the plate and the bearing race.  

Not pretty....

So armed with my trusty lump hammer it was time to get this bearing race out. Placing the hub on the ground and gave the protruding bar a couple of heavy duty blows.  Eventually I was rewarded by the bar shifting and I turned the hub over expecting to finally see some movement of the bearing race.

Not a chance - unfortunately all I had achieved was to crack the welds between the plate and the race (demonstrating that my welding had achieved zero penetration into the hardened steel race).  

I tried a couple more times to weld the plate in again but the result was the same each time - my welder could just not get enough heat into the bearing to get any weld penetration and after a few blows with the hammer, my home-made drift simply parted company with the bearing.

I gave Ben at Simply Performance a call and he acknowledged that these bearings can sometimes be a complete pain to remove.  His suggestion was to heat the rear hub up and then dunk it into an oil bath, to repeat this a few times and then to try drifting the bearing out. 

Determined to not let this bearing beat me I was all for giving this method a go, but when I was up at AK before Christmas I mentioned my dilemma to Jon who recommended just running a really hot bead of weld around the bearing to shrink it (as per my original thought) and offered to help me out if I brought my hub in.

So a couple of weeks back I drove up to AK with my hub and in less than 5 minutes Jon had welded round the bearing (with a welder about 10 times the size of mine) and drifted it out with ease!!!  I didn't even have time for a cup of tea before I was back out of the factory!!!!

I reckon I must have put at least 10-12 hours of effort into shifting that bearing (probably more).  It just shows that having the right gear can make such a difference.  In fact the difference in welding power between my hobby welder and the AK industrial welder was clear when Jon handed the hub back to me and it was so hot I could barely hold it!!

So the bearing is out and I think that completes the strip-down of the rear end. (I still have to drill out the brake shield retaining screws from when I sheared the heads off - but I'll deal with that as part of the rebuild).

Finally - last taper bearing removed.
Happy Days!!!