Saturday 2 March 2019

Who ya gonna call - Rustbusters!

I am very behind where I had hoped to be in terms of donor part preparation.

The chassis and body kit have been delivered but, although I have stripped down both the front and rear axles (except for my saga with the rear hub taper bearing), I have not degreased, de-rusted or re-painted any of the parts.

My previous experience with working on cars has told me that there is no miracle when it comes to removal of rust.  It comes down to elbow grease and plenty of wire brushing (unless one has one's own sand blasting cabinet - which unfortunately I don't!).

I am also not a fan of the various rust encapsulation products that are available (POR-15 and the like).  While many people swear by them, again my experience has taught me that the only way to prevent rust from coming back is to remove it completely before attempting any painting or coating.

That said, while I was looking through the various auto restoration catalogues that I have, plus some internet / forum browsing, there do seem to be products available that do 'what they say on the tin' and remove rust.  One that caught my attention was Bilt Hamber deox-C.  This is mentioned on many of the automotive forums, generally in positive terms, plus it was also used with great success and recommended by my fellow local builder, Richard.

Photo courtesy of Bilthamber.com


"deox-C is a crystalline, 100% active corrosion removal product formulated for the removal of corrosion products from steel, stainless steel and most ferrous materials. This product when dissolved in tap water, produces a bath of powerful rust removing liquid."

All sounds very good.  The only downside I could see was the price, as 4kg of deox-C runs at a shade under £50 and I figured I was going to need a fair amount to immerse all my bits.  So embracing my wife's new fiscal strategy, I continued to look for cheaper solutions (no pun intended!).

Further internet browsing revealed that the primary active ingredient in deox-C is citric acid.  The science bit goes along the lines of:

Citric Acid + Rust = Iron Oxide + Carbon Monoxide + Water + Hydrogen

Or for those of us who did chemistry at school many years ago....

C6H8O7 + Fe2O3 = 2 FeO + 6 CO + 2 H2O + 2 H2

However the really important bit for me was that I could pick up 5kg of Citric Acid plus a small aquarium heater (rust removal process works best if solution is maintained at around 20degC) from amazon for £20!

Rust busting on the cheap..!!

So armed with a large plastic bucket, I made up an approximately 10% solution of citric acid by dissolving 2kg of the crystals to around 18 litres of hot tap water.  I added the aquarium heater (I used a 50W heater) set to around 24degC and my rust removal bath was ready!

Ready for a bath...

The first bits to be de-rusted were the rear pendulum bracket, the rear wishbone tie and the rear spacer tubes - these were all quite heavily corroded.  I just immersed them in the bath without any prior treatment - no washing or brushing - just straight in!  Surprising bubbles started forming on the surface of the metal very quickly and before long the solution was gently bubbling away!  I covered the top of the bucket with a foil lid and left it for a week for the magic to happen.

Its a kinda magic...!

A week later when I took the foil off the top of the bucket I was greeted with a delightful black swampy looking bucket.

One week later!

Then I set to work with a bucket of hot soapy water and various nylon, brass and steel brushes.  To say I was impressed would be an understatement.  All surface corrosion had been converted to a grey sludge which washed off quite easily giving clean metal underneath.  The solution also managed to loosen off most of the remaining paint on the parts which again brushed off with little effort.

Rear Pendulum - before...

On removal from the acid bath...

After a wash and brush up!

Rear wishbone ties and spacer tubes before...

Rear wishbone tie after wash and brush

I forgot to take any pictures of the spacer tubes after their initial clean but they had come up practically like new with just a couple of spots of corrosion left on them.  The eagle-eyed of you will also notice that the wishbone tie in the photo above is my original one (with the missing and irreplaceable bushes).  There is a reason for that - which I will come to in a future post.

After the initial clean of the parts there were still a few areas of corrosion left so I decided to give them a dunk for another week (plus I stuck in the front brake calliper carriers at this time for a soak as well).

WORD OF WARNING - it is possible to leave parts in the acid solution for too long.  Once there is no more rust for the solution to work on, it starts to etch the surface of the metal (causing microscopic pitting of the surface).  I read this on the internet after I had worked it out for myself.  After two weeks of immersion of the heavy cast pendulum bracket was unaffected, but the thinner metal brackets on the wishbone ties were showing some minor pitting and the spacer tubes, which after one week looked almost new, were extensively pitted. Nothing that a good wire brushing / flap wheel won't cure - but something to be aware of!

Etching of surface due to over immersion

A final wash and brush of all the other parts, plus a quick tidy up with a wire brush in my drill has left the first batch of parts looking nice and shiny and ready for re-painting / coating.  

After bathing for two weeks and a quick wash..
...followed by a quick wire brushing = shiny parts!

I have to say the results were far better than I was expecting and will be working my way through the rest of my rusty donor parts in the same manner. 

Thursday 21 February 2019

Rear Axle Strip Down - Part 5

For those of you who have been following my build blog, you may recall that I was left scratching my head regarding how to remove the lower fulcrum taper bearing races from the rear hubs (See Rear Axle Strip Down - Part 2).

The bearing races have to be knocked out from behind - but due to the configuration of the lower fulcrum shaft housing - getting a drift down the shaft housing from the opposite side and then engaging in the slot behind the bearing proved very difficult.  Jaguar probably have a special tool for this but I couldn't find anything useful on the internet so some improvisation was required.

The first attempts involved the use of a large flat blade screwdriver - I could just about get the blade to engage on the back of the bearing race but any attempt to apply some force with my large hammer, just resulted in the screwdriver slipping off the race.  I did persist with this approach for some time until I had had enough of hitting my thumb and forefinger with a 1.5kg hammer......

While idly flicking through my latest Toolstation catalogue I came across a pry bar set - which is something I probably need anyway and I thought the smaller of the set might just have enough crank on the end of it to get some purchase on the back of these troublesome bearing races.  

Pry bar set was duly purchased.  When I picked it up I was rather surprised by the size of the box it was in and was worried that I had made a bit of a mistake and ordered some industrial sized pry bars by mistake.  As it was the largest of the set is rather mighty in size but the smallest one did look as though it might do the job.

And it did!!  On three out of the four taper bearings....

It wasn't all plain sailing and generally required a lot of hammering, alternating sides (and plenty of swearing when I hit my thumb / fingers with hammer) but eventually I managed to knock out three of the races.  The fourth, however, seemed stuck fast.

Every now and then, in amongst my other jobs in the garage, I would pick up the hammer and pry bar and bash the hell out the final bearing.  And nothing!  Not even a sign of movement.

Eventually I was hitting it so hard that the end of the pry bar gave up and just curled over.....


Guess which one I was hitting....

I decided to give up on a rear attack and go for a full frontal assault.  I bought a small 2-legged hub puller off Amazon hoping that the jaws would be small enough to fit into the recesses behind the bearing.  I did have to grind the ends of the jaws down slightly to fit and it was very fiddly trying to keep the jaws hooked into the recesses while tightening up the puller - I used the largest pry bar from the set I had bought across the front of the bearing recess for the puller to bear against.


With everything in place I started tightening up the puller, expecting a bit of resistance at first but anticipating the crack when the bearing race would shift slightly in the housing.  I got lots of resistance - to the point where the puller started to deform - but no crack and no movement of the blasted bearing....


Back to the drawing board........

Sunday 17 February 2019

London Classic Car Show - ExCel - 16 February 2019

Spent the day yesterday at the ExCel Centre in London, with my son and a friend of his, visiting the London Classic Car Show.

There was a fair variety of vehicles on display from vintage, through to modern day supercars (although I draw the line at modern day BMW being called a classic - apologies to any BMW drivers reading), with a good showing of American cars to boot.

There was also a tribute to the film "The Italian Job" which is at 50 years old is apparently the same age as me!  On show were various cars from the film, not only the red, white and blue Mini Coopers, but also a Lamborghini Muira (I would love to have one of those) an Aston Martin DB4 and an E-Type Jaguar (there were plenty of E-Types on display around the show).

630kg Mini with 1000kg of gold in the boot...hmmm

This is such a beautiful car!!!!

"We are the self preservation society..."


I spotted a few Cobras on display.  No originals as far as I could see, but a Gardner Douglas, a couple of Dax models, a Pilgrim and a couple of AK 427s were to be found.

I also found this beauty.  A Kirkham 427 with polished aluminium body and brushed stripes.

Stunning!

Apparently David Kirkham was restoring an original Shelby 427 when a relative asked him if he could repair a Polish Fighter Jet that had been damaged in transit.  He figured the aircraft panelling was similar construction to the Shelby, 
found the manufacturer in Poland and sent off a fax saying"Can you guys build an aluminum bodied car?" Within 12 hours he got a reply: "No problem."
A week later, David was on a plane to Warsaw with an English-Polish dictionary, a toy model of a Cobra, and a dream. He spent a week scouting the factory and exploring their manufacturing abilities. He saw a silent factory with idle machines. The enormous factory had produced aircraft for over 60 years. After meeting with three generations of skilled craftsmen eager to make these cars, he forged some agreements and left filled with high expectations and enthusiasm. And that was the beginning of Kirkham Motorsports, which since 1994 has become one of the leading manufacturers in the component car industry, although perhaps better known on the other side of the pond. 

Still stunning...!!
I have no idea what it takes to keep that polished body in that condition but it does look simply beautiful.  And I have discovered on the Kirkham Motorsports website that you can also order a body in polished copper or bronze......
Oh well I can keep on dreaming!

Friday 1 February 2019

I must be going nuts.....

Unfortunately delivery of the AK chassis / body has coincided with my wife's implementation of a post-Christmas revised domestic fiscal strategy (i.e my spending has been capped....).  

In the meantime I decided to sort out the various nuts and bolts that AK supply with the new kit and try and work out what else I might need to buy (once funds are released!).

AK supply two packages of nuts and bolts.  One is identified as 'Body Bolts" and the other as "Generation II - Nut / Bolt Kit".  They also include in the documentation that comes with the kit, two lists detailing the contents of these two packs.


So all I needed to do was check the contents of the bags matched the lists - simple.  Well, not as simple as it sounds.

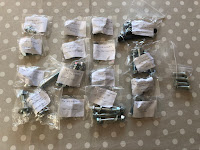
Firstly the nuts and bolts just come in a variety of bags with no indication of sizes (and unfortunately my eye is not practiced enough to know a M8 from an M10 by sight alone and just to mix it up a bit some of the bolts are metric and some are imperial).  

So I spent a happy hour or so with a set of callipers and a ruler trying to identify  all the various bolts and tick them off against the supplied lists.  I also had the AK build manual to hand to assist (although the fact that the AK Nut and Bolt list is largely in metric but the AK Build Manual refers to many of the washers in imperial sizes does confuse things slightly).

Having (successfully?!) identified all the fixings, I separated them into individual labelled bags, so that as the build progresses I can identify all the fixings needed for each stage. (I did seem to be short of 4No 35mm by 14mm washers - but on the plus side I had a extra 2No M10x30 bolts and an extra 14No M8by25 bolts!!!).


It seems that the nut/bolt kit is pretty comprehensive - containing the majority of the required fixings for the chassis / suspension build stage.  So I suppose I was a bit surprised / disappointed that they couldn't supply all the required fixings.  I know some will be specific to the year / model of the donor vehicle and get that they can't cater for all cases.  

But, for example, the build manual indicates that some M6 machine screws and M6 washers are needed to set the caster angles on the front suspension but these are not included. Neither are the M10by70 bolts, M10 washers and M10 Nylocs required to fix the steering rack.  Or the M12 Nylocs to fix the rear control arm bracket onto the diff......

Maybe I'm being overly picky - but having provided 95% of the fixings, it would be much effort (or cost) to supply the remaining 5% of fixings where the sizes are known (and not dependant on donor parts).

Saturday 12 January 2019

Body / Chassis Delivery Day

Delivery day for the body / chassis kit has finally arrived!!  It was a cold and grey day but thankfully not raining.

I spent the morning doing some final tidying of the garage and getting the exchange donor parts out ready to return to AK.  Note that AK now no longer need the rear wishbones as exchange items so it was just the front lower wishbones, stub axles / uprights and driveshafts that needed to be returned.

Exchange donor parts ready to go back

Noel, the AK delivery driver, was right on time; having advised he would aim to arrive between 1.30 and 2.00pm, he pulled up bang on 1.45pm.

What a glorious sight!!

I'd booked the assistance of a couple of friends, Richard and Paul, to help unload.  First task was to roll the body / chassis off the back of the trailer and onto the drive way.  Next was to remove the variety of parts that come with the kit, plus the extra parts that I had ordered, from the body tub where AK had loaded them for transport.  We also discovered some parts loaded in the boot later on (after lifting the body off....).

Lots of parcels in the body tub!

The body was temporarily bolted to the chassis with 4 bolts.  Once these were removed, the four of us lifted the body off the chassis and onto the waiting body support frame.

Something was not right...Despite my matching the AK factory frame measurements, the body did not sit right on the frame and the front cross member of the frame was nowhere near the front footwells in the body that were supposed to be sat on it.  

After a bit of head scratching we all concluded I would need to buy some additional bearers to sit under the floorpan - a job for later.

Next task was to lift the chassis into the garage and sit it on four axle stands (with a strip of old carpet to protect the freshly powder coated chassis!).

Chassis in its new home!

Then a quick trip to Wickes was in order to get some extra lengths of 63mm by 38mm timber studding and sort out the body support problem.

On return I realised what the problem was.  We had put the body on the frame with the rear support under the channel for the rear axle (which is how Stuart Holden had supported his body)

Stuart Holden's body support frame - rear support sits in channel for rear axle

Although my frame was based on Stuart's design, the measurements I had taken at the AK factory were based on the rear support sitting under the boot floor.  

Richard and I managed to lift the body up and forward on my frame and hey presto! now the body sat flat and the front footwells were sat on the front cross member of the frame.  There was still quite a gap under the rest of the body, and so the extra timber I had bought didn't go to waste and we added an extra crossmember to sit under the rear of the passenger compartment.  A bit of fine tuning with some pieces of thick corrugated cardboard was required to get all contact points supported on the frame.

Body sitting correctly on frame - additional crossmember added to support rear of floorpan


With that sorted, final job for the day was to stow all the bits and pieces under the chassis and wheel the body into the garage over the chassis (and it all fitted - just!)


Hurrah - it fits!!  There is even a bit of working space as well!

With body safely stored it was time to retire for a well earned beer.  Thanks to Richard and Paul for your help

Think I could be standing here for some time......

Wednesday 2 January 2019

Christmas Holiday Projects - Body Support Frame

Despite being a bit behind with cleaning and painting the donor parts, with the AK body and chassis arriving early in the New Year I needed to get the garage ready to receive the kit.

My plan was to build a timber frame to store the body over the chassis; the idea being that the body/frame can be moved out of the garage to allow work on the chassis to proceed.  The idea came from another AK owner - Stuart Holden - and I have basically taken his frame layout as per the plans on his blog (although I did change some of the dimensions having taken my own measurements of the frame AK use to support their bodies in the factory).

General layout of body frame - courtesy of Stuart Holden

The AK body is supported at the front under the footwells and the kick-up at the rear sits under the boot floor.  The whole frame is wide enough to span over the chassis and sits on casters to allow it to be moved out over the chassis to allow working space.

I bought fourteen 2.4m lengths of 38mm by 63mm timber studding from Wickes, M8 coach bolts, coach screws (80mm and 60mm length) and washers from Namrick and some heavy duty casters from Screwfix.

Christmas Holiday project materials!

Timber cut to size

Fixings 

I started by making the two end frames.  All joints were bolted and glued for strength.  I then joined the added the sides and the diagonals - again all bolted and glued for strength.

I recommend checking constantly that all the elements are square and true (check once, check twice and check again) before and after fixing!.  Despite all my careful measuring and marking I did have to refix one of the diagonal bracings on the front frame, as although I checked the squareness several times before fixing, after fixing, one vertical was clearly out of plumb by a significant margin!! 

Front sub-frame completed...

...and rear sub-frame completed
Subframes joined, braced and casters fitted

The finished frame is nice and solid and hopefully be fit for the intended task (time will tell).  It does look suspiciously like a double bed frame - a point which my missus remarked upon and that it would be quite useful with all the time I would be spending in the garage...not sure what she is getting at!

It is a slightly snugger fit in the garage than I was hoping for so I will need to do a bit more rearranging to give a bit more room down the sides of the frame.  But a days work well spent I think!

Bit tight down the sides......

Early Christmas Present....

Over Christmas I am planning to build a frame to support the AK body while I work on the chassis.  I wanted to check the measurements of the frame that AK use to support their bodies in the factory when they come out of the molds so decided to pay them a quick visit just before Christmas.

When making the arrangements to visit, Carla told me that I must have been a very good boy this year as Santa had a surprise for me in the workshop!!!!

When I arrived at AK I was greeted by the obligatory cup of tea (and chocolates as it was the festive season), and then Wendi showed me our AK body in the workshop (excited) and then took me down to the powder coaters to see the chassis being finished off (even more excited!) - roll on Jan 11th 2019!!

My Gen III chassis fresh out of the oven!

AK body ready and waiting!