Thursday, 21 February 2019

Rear Axle Strip Down - Part 5

For those of you who have been following my build blog, you may recall that I was left scratching my head regarding how to remove the lower fulcrum taper bearing races from the rear hubs (See Rear Axle Strip Down - Part 2).

The bearing races have to be knocked out from behind - but due to the configuration of the lower fulcrum shaft housing - getting a drift down the shaft housing from the opposite side and then engaging in the slot behind the bearing proved very difficult.  Jaguar probably have a special tool for this but I couldn't find anything useful on the internet so some improvisation was required.

The first attempts involved the use of a large flat blade screwdriver - I could just about get the blade to engage on the back of the bearing race but any attempt to apply some force with my large hammer, just resulted in the screwdriver slipping off the race.  I did persist with this approach for some time until I had had enough of hitting my thumb and forefinger with a 1.5kg hammer......

While idly flicking through my latest Toolstation catalogue I came across a pry bar set - which is something I probably need anyway and I thought the smaller of the set might just have enough crank on the end of it to get some purchase on the back of these troublesome bearing races.  

Pry bar set was duly purchased.  When I picked it up I was rather surprised by the size of the box it was in and was worried that I had made a bit of a mistake and ordered some industrial sized pry bars by mistake.  As it was the largest of the set is rather mighty in size but the smallest one did look as though it might do the job.

And it did!!  On three out of the four taper bearings....

It wasn't all plain sailing and generally required a lot of hammering, alternating sides (and plenty of swearing when I hit my thumb / fingers with hammer) but eventually I managed to knock out three of the races.  The fourth, however, seemed stuck fast.

Every now and then, in amongst my other jobs in the garage, I would pick up the hammer and pry bar and bash the hell out the final bearing.  And nothing!  Not even a sign of movement.

Eventually I was hitting it so hard that the end of the pry bar gave up and just curled over.....


Guess which one I was hitting....

I decided to give up on a rear attack and go for a full frontal assault.  I bought a small 2-legged hub puller off Amazon hoping that the jaws would be small enough to fit into the recesses behind the bearing.  I did have to grind the ends of the jaws down slightly to fit and it was very fiddly trying to keep the jaws hooked into the recesses while tightening up the puller - I used the largest pry bar from the set I had bought across the front of the bearing recess for the puller to bear against.


With everything in place I started tightening up the puller, expecting a bit of resistance at first but anticipating the crack when the bearing race would shift slightly in the housing.  I got lots of resistance - to the point where the puller started to deform - but no crack and no movement of the blasted bearing....


Back to the drawing board........

Sunday, 17 February 2019

London Classic Car Show - ExCel - 16 February 2019

Spent the day yesterday at the ExCel Centre in London, with my son and a friend of his, visiting the London Classic Car Show.

There was a fair variety of vehicles on display from vintage, through to modern day supercars (although I draw the line at modern day BMW being called a classic - apologies to any BMW drivers reading), with a good showing of American cars to boot.

There was also a tribute to the film "The Italian Job" which is at 50 years old is apparently the same age as me!  On show were various cars from the film, not only the red, white and blue Mini Coopers, but also a Lamborghini Muira (I would love to have one of those) an Aston Martin DB4 and an E-Type Jaguar (there were plenty of E-Types on display around the show).

630kg Mini with 1000kg of gold in the boot...hmmm

This is such a beautiful car!!!!

"We are the self preservation society..."


I spotted a few Cobras on display.  No originals as far as I could see, but a Gardner Douglas, a couple of Dax models, a Pilgrim and a couple of AK 427s were to be found.

I also found this beauty.  A Kirkham 427 with polished aluminium body and brushed stripes.

Stunning!

Apparently David Kirkham was restoring an original Shelby 427 when a relative asked him if he could repair a Polish Fighter Jet that had been damaged in transit.  He figured the aircraft panelling was similar construction to the Shelby, 
found the manufacturer in Poland and sent off a fax saying"Can you guys build an aluminum bodied car?" Within 12 hours he got a reply: "No problem."
A week later, David was on a plane to Warsaw with an English-Polish dictionary, a toy model of a Cobra, and a dream. He spent a week scouting the factory and exploring their manufacturing abilities. He saw a silent factory with idle machines. The enormous factory had produced aircraft for over 60 years. After meeting with three generations of skilled craftsmen eager to make these cars, he forged some agreements and left filled with high expectations and enthusiasm. And that was the beginning of Kirkham Motorsports, which since 1994 has become one of the leading manufacturers in the component car industry, although perhaps better known on the other side of the pond. 

Still stunning...!!
I have no idea what it takes to keep that polished body in that condition but it does look simply beautiful.  And I have discovered on the Kirkham Motorsports website that you can also order a body in polished copper or bronze......
Oh well I can keep on dreaming!

Friday, 1 February 2019

I must be going nuts.....

Unfortunately delivery of the AK chassis / body has coincided with my wife's implementation of a post-Christmas revised domestic fiscal strategy (i.e my spending has been capped....).  

In the meantime I decided to sort out the various nuts and bolts that AK supply with the new kit and try and work out what else I might need to buy (once funds are released!).

AK supply two packages of nuts and bolts.  One is identified as 'Body Bolts" and the other as "Generation II - Nut / Bolt Kit".  They also include in the documentation that comes with the kit, two lists detailing the contents of these two packs.


So all I needed to do was check the contents of the bags matched the lists - simple.  Well, not as simple as it sounds.

Firstly the nuts and bolts just come in a variety of bags with no indication of sizes (and unfortunately my eye is not practiced enough to know a M8 from an M10 by sight alone and just to mix it up a bit some of the bolts are metric and some are imperial).  

So I spent a happy hour or so with a set of callipers and a ruler trying to identify  all the various bolts and tick them off against the supplied lists.  I also had the AK build manual to hand to assist (although the fact that the AK Nut and Bolt list is largely in metric but the AK Build Manual refers to many of the washers in imperial sizes does confuse things slightly).

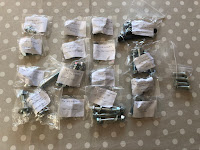
Having (successfully?!) identified all the fixings, I separated them into individual labelled bags, so that as the build progresses I can identify all the fixings needed for each stage. (I did seem to be short of 4No 35mm by 14mm washers - but on the plus side I had a extra 2No M10x30 bolts and an extra 14No M8by25 bolts!!!).


It seems that the nut/bolt kit is pretty comprehensive - containing the majority of the required fixings for the chassis / suspension build stage.  So I suppose I was a bit surprised / disappointed that they couldn't supply all the required fixings.  I know some will be specific to the year / model of the donor vehicle and get that they can't cater for all cases.  

But, for example, the build manual indicates that some M6 machine screws and M6 washers are needed to set the caster angles on the front suspension but these are not included. Neither are the M10by70 bolts, M10 washers and M10 Nylocs required to fix the steering rack.  Or the M12 Nylocs to fix the rear control arm bracket onto the diff......

Maybe I'm being overly picky - but having provided 95% of the fixings, it would be much effort (or cost) to supply the remaining 5% of fixings where the sizes are known (and not dependant on donor parts).